-
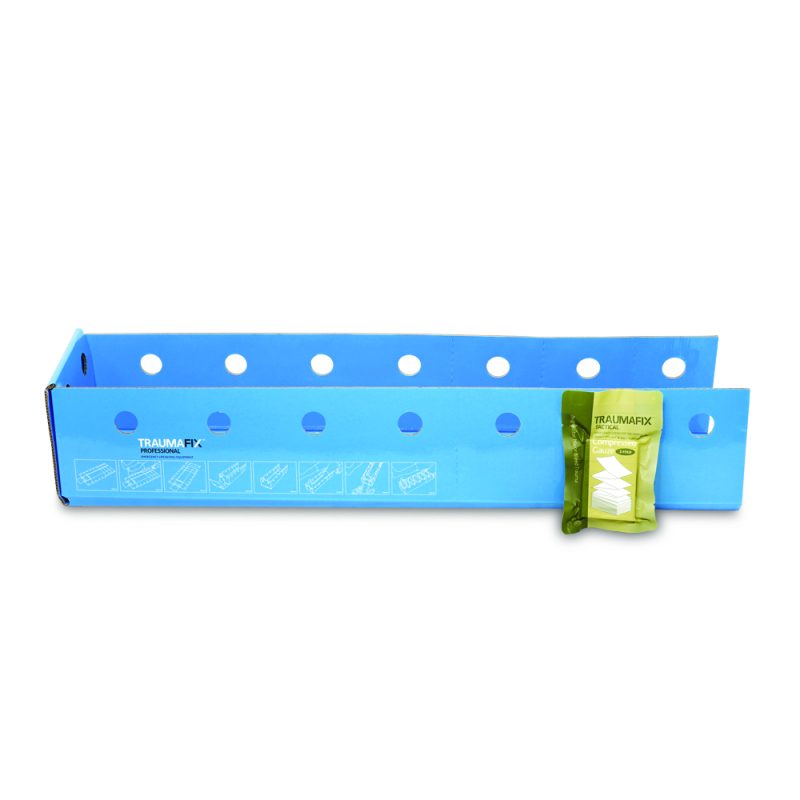
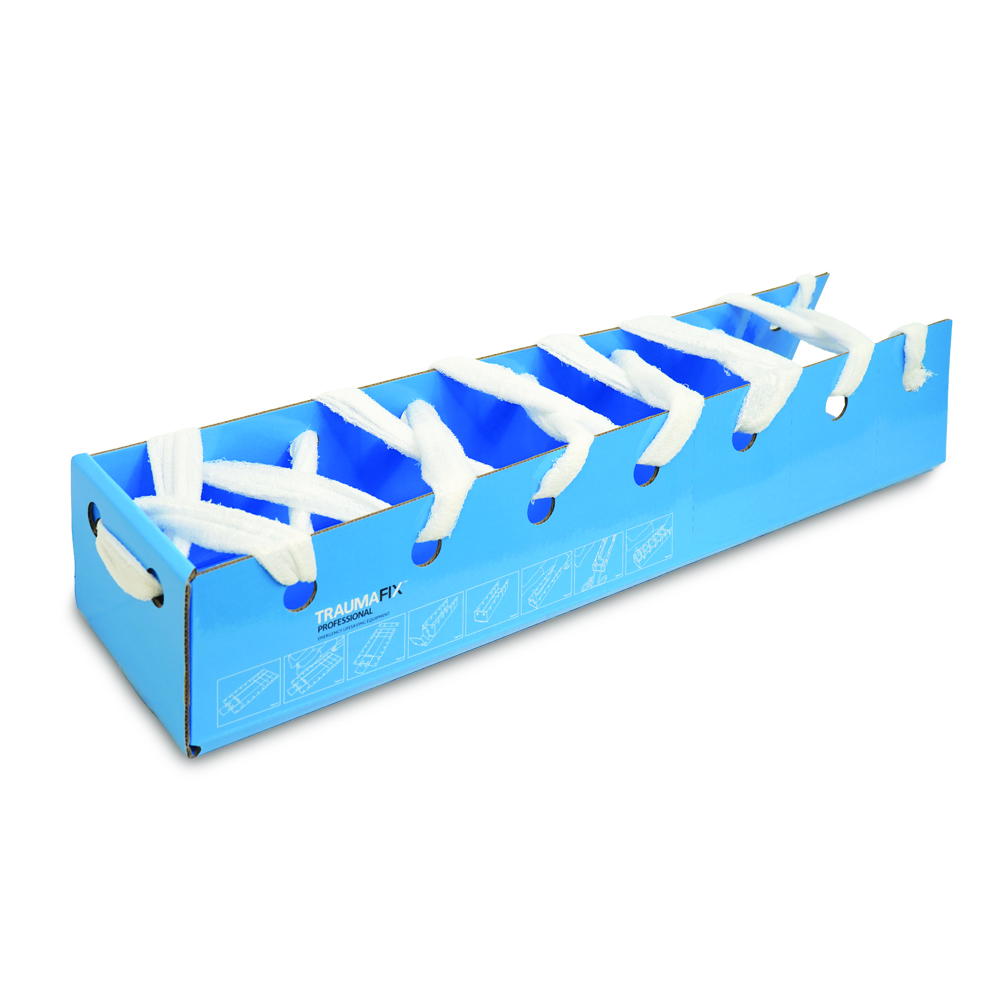
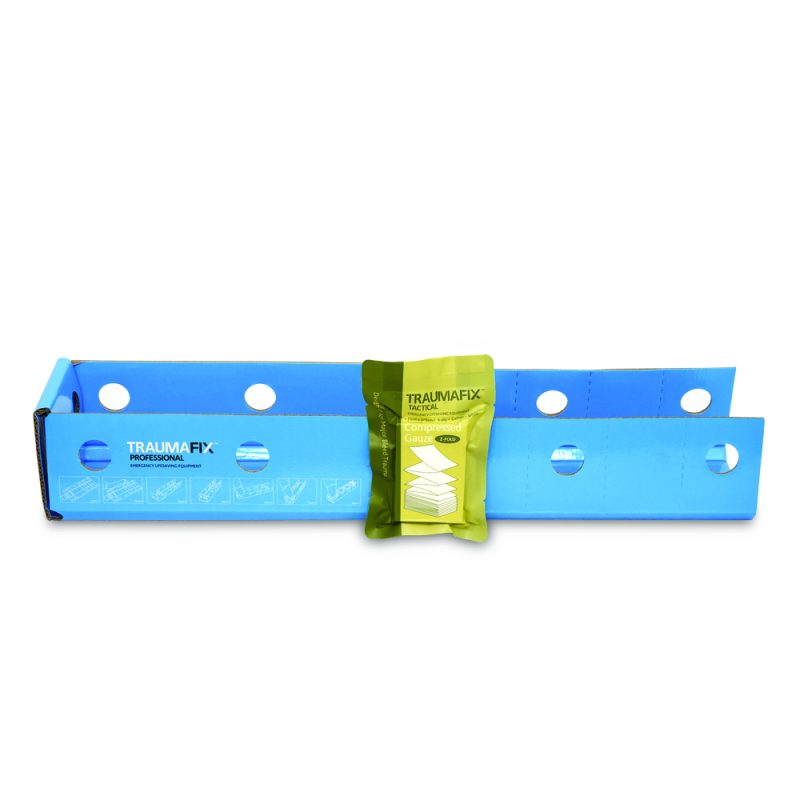
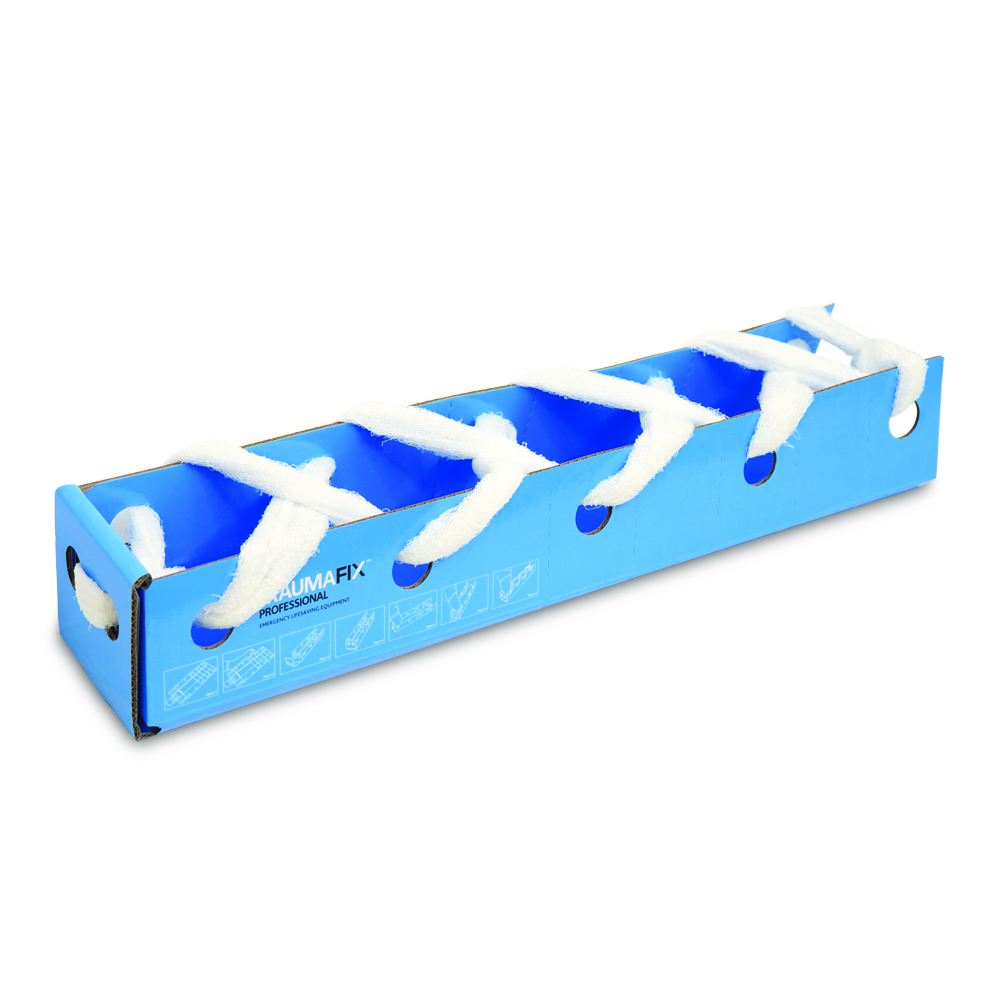
TraumaFix Cardboard Splint with Compressed Gauze – Large
- Quick & Easy to Use– Simply fold into shape with no scissors required.
- Adjustable Fit– Innovative perforated tear-off sections adjust the splint to all sizes.
- Secure Stabilisation– Integrated holes allow for threading gauze to keep the injury secure and stable.
- Lightweight & Compact– Flat space-saving design.
- Durable Construction– Made from strong, high-quality gloss finish cardboard for reliable support.
- Includes Compressed Gauze– Each splint is supplied with Traumafix® compressed gauze for added convenience.
-
TraumaFix Cardboard Splint with Compressed Gauze – Small
- Quick & Easy to Use– Simply fold into shape with no scissors required.
- Adjustable Fit– Innovative perforated tear-off sections adjust the splint to all sizes.
- Secure Stabilisation– Integrated holes allow for threading gauze to keep the injury secure and stable.
- Lightweight & Compact– Flat space-saving design.
- Durable Construction– Made from strong, high-quality gloss finish cardboard for reliable support.
- Includes Compressed Gauze– Each splint is supplied with Traumafix® compressed gauze for added convenience.
-
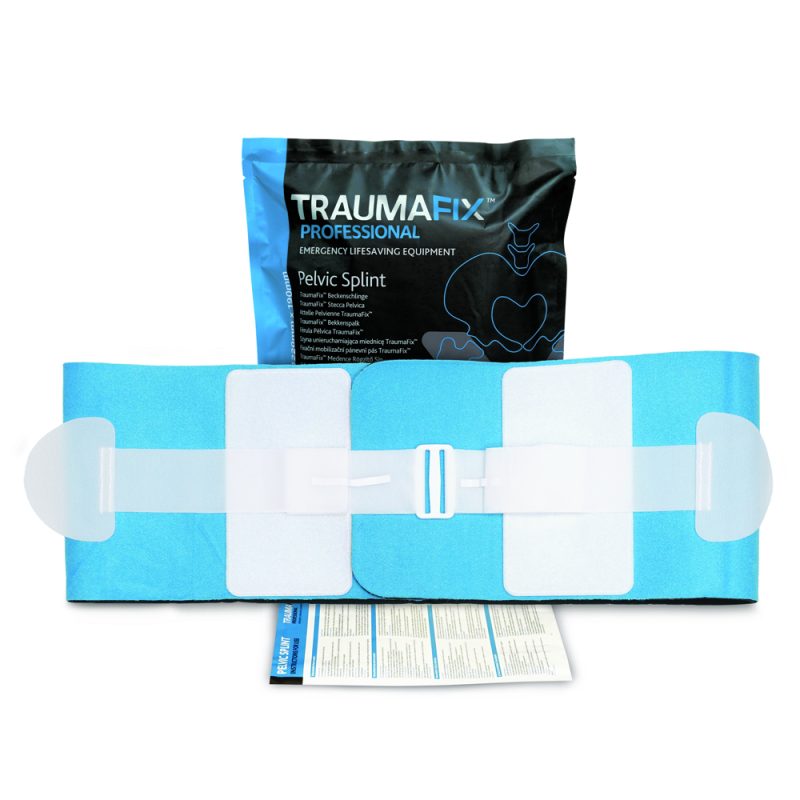
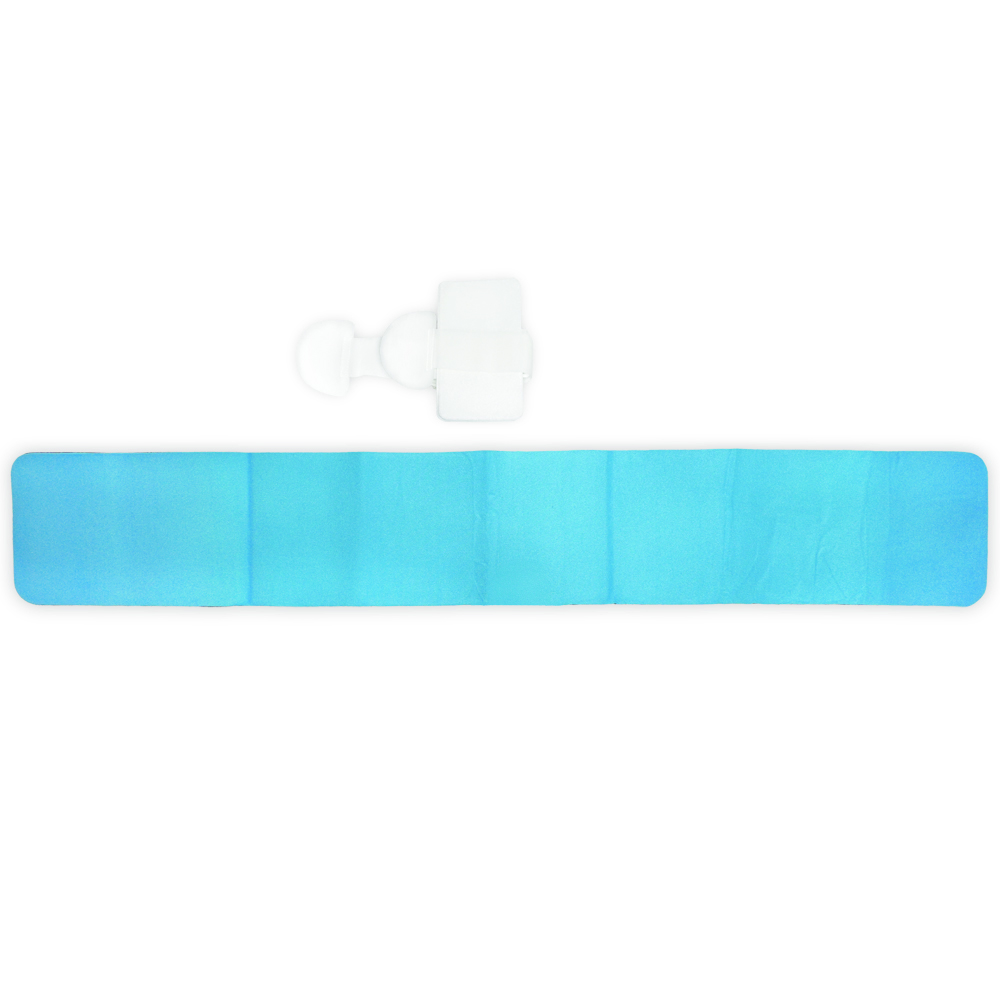
TraumaFix Professional Pelvic Splint
Key Benefits of the Traumafix Pelvic Splint:
- Effective Stabilisation: Applies compression to help immobilise the pelvis when a fracture is suspected.
- Ultra-Light and Portable: The Traumafix Pelvic Splint is easy to carry and pack with other emergency equipment.
- One Size, Multiple Applications: Adaptable for all body types, and can be trimmed for better fit and access.
- Efficient to Use: Designed for quick and easy one-person application—for emergency situations where every second counts.
- Skin-Friendly Design: Stitch-free interior reduces the risk of pressure ulcers and tissue damage.
- Medical Access Ready: Can be modified to allow access to vital body areas for emergency medical procedures.
-
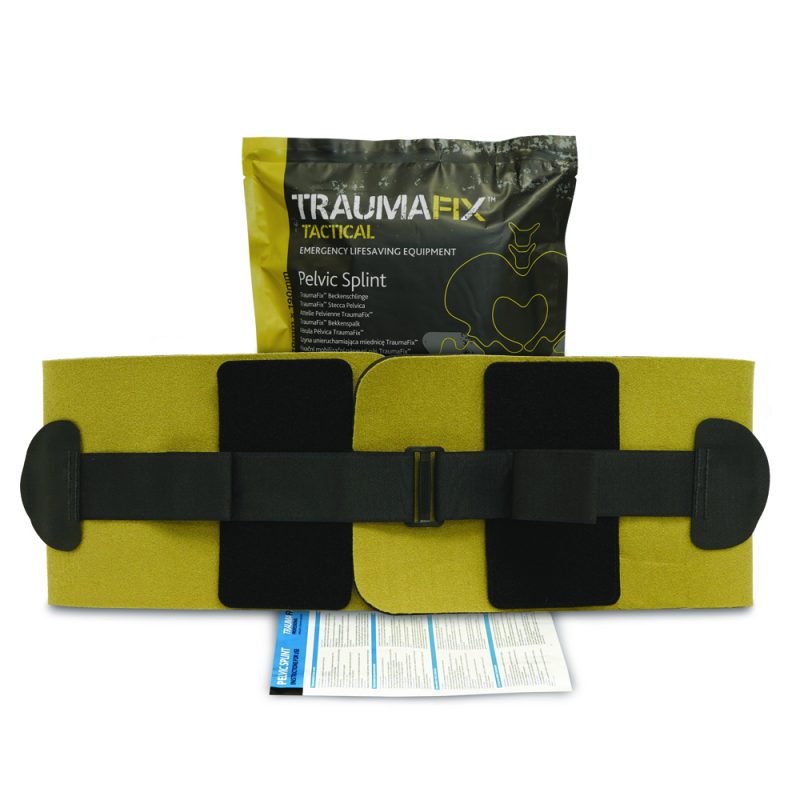
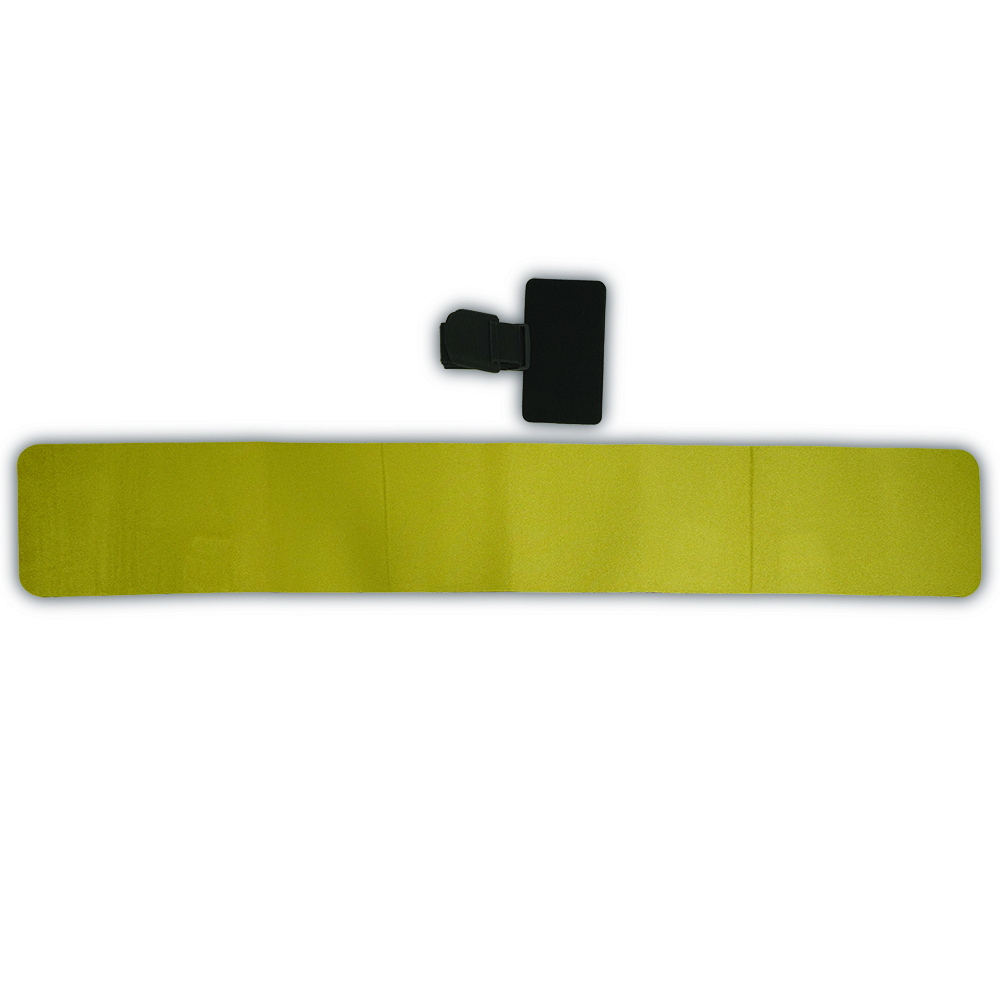
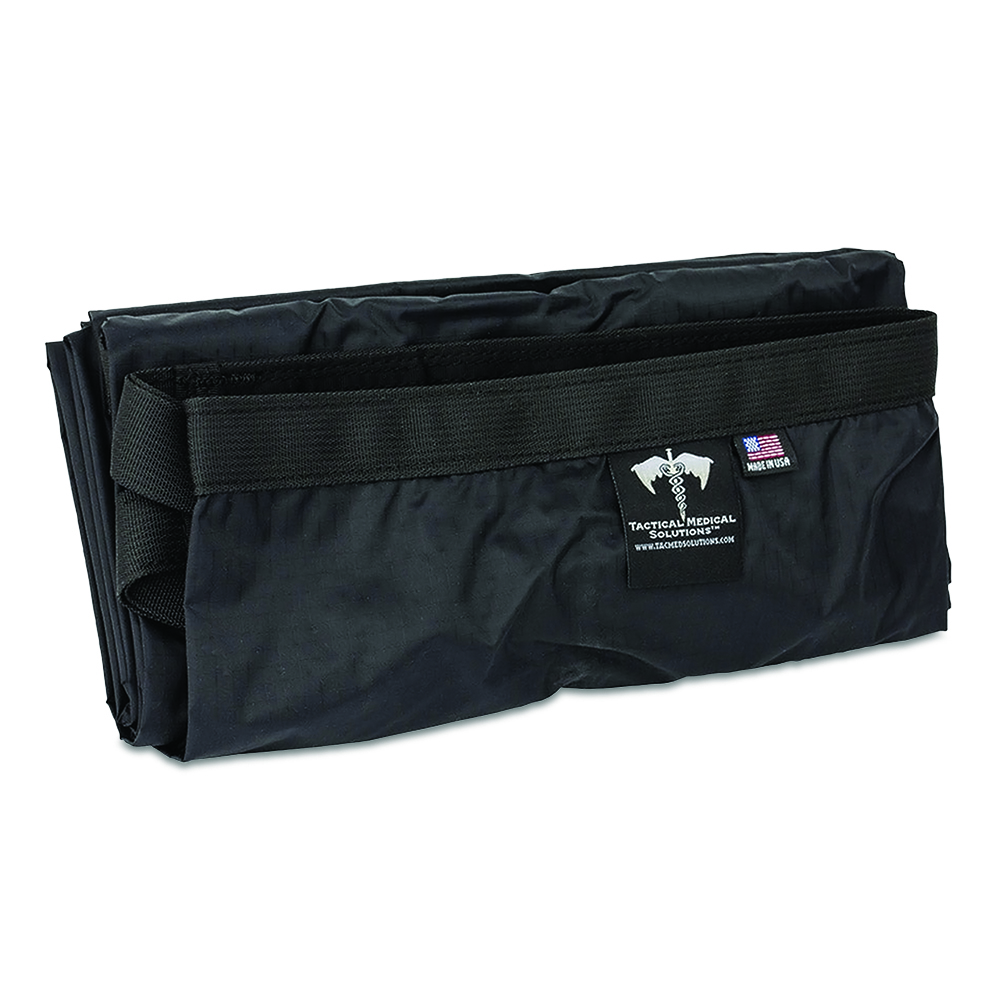
TraumaFix Tactical Pelvic Splint
Key Benefits of the Traumafix Pelvic Splint:
- Effective Stabilisation: Applies compression to help immobilise the pelvis when a fracture is suspected.
- Ultra-Light and Portable: The Traumafix Pelvic Splint is easy to carry and pack with other emergency equipment.
- One Size, Multiple Applications: Adaptable for all body types, and can be trimmed for better fit and access.
- Efficient to Use: Designed for quick and easy one-person application—for emergency situations where every second counts.
- Skin-Friendly Design: Stitch-free interior reduces the risk of pressure ulcers and tissue damage.
- Medical Access Ready: Can be modified to allow access to vital body areas for emergency medical procedures.
-
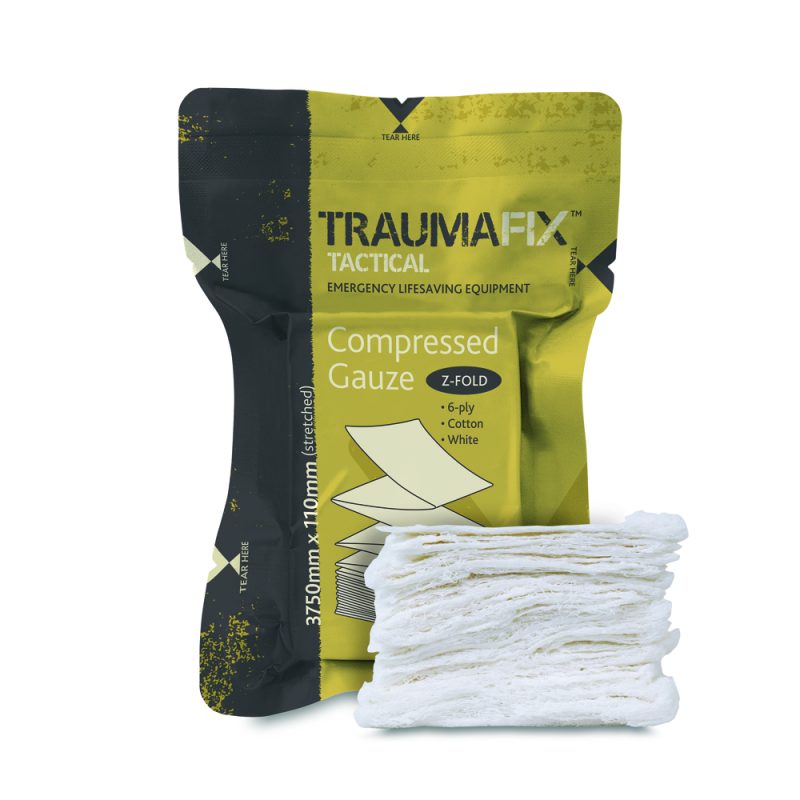
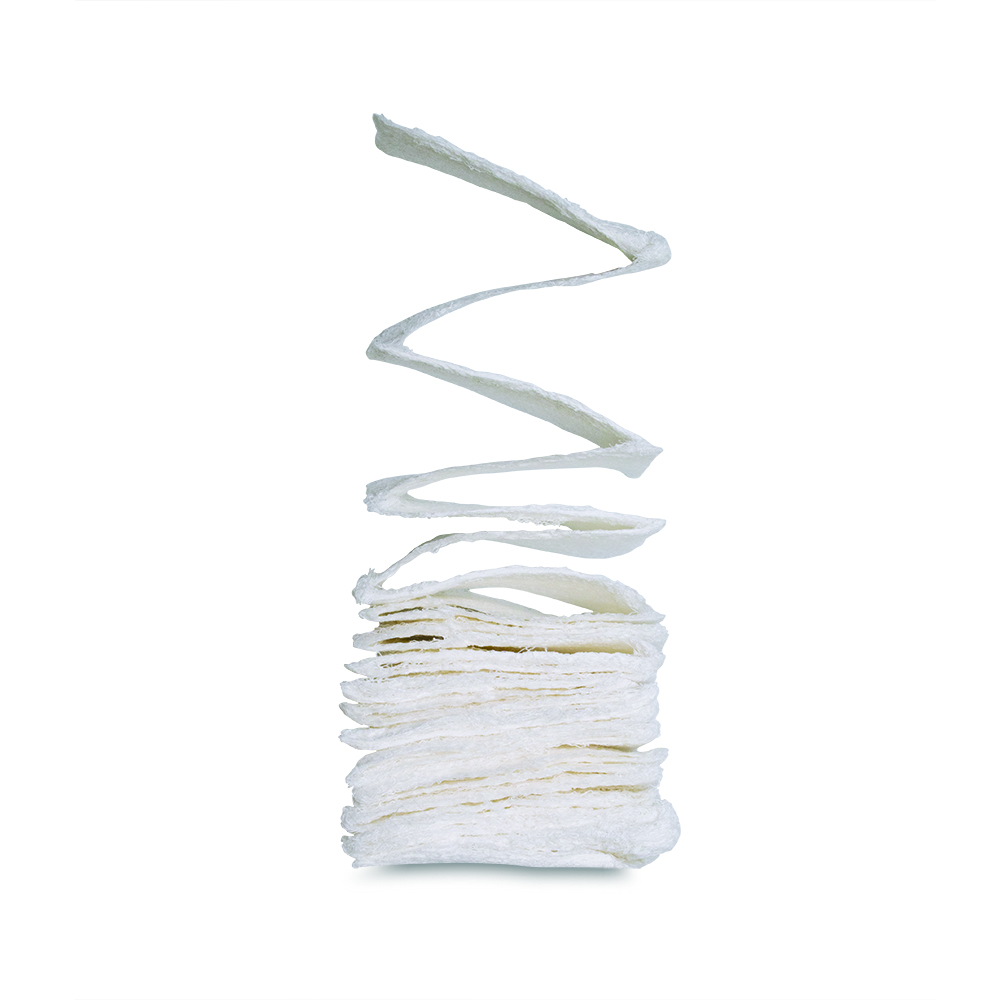
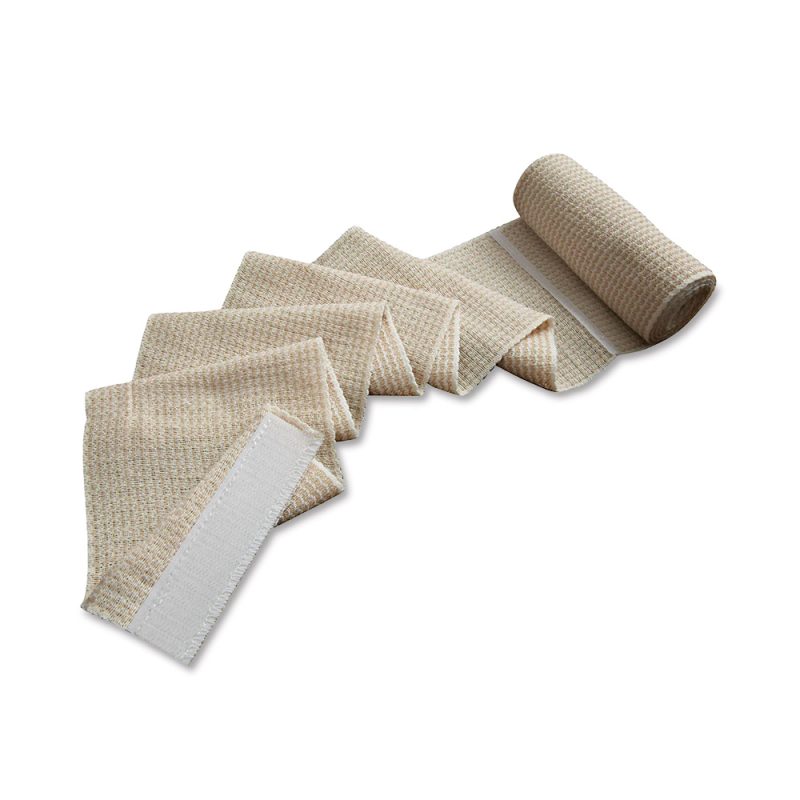
TraumaFix Compressed Gauze
- Sterile and Absorbent: Made from 100% 6-ply white cotton, ensuring maximum absorption.
- Safe Deployment: When the outer packaging is opened, an inner bag can be removed, featuring a red pull tab that marks the end of the gauze for easy deployment. This ensures smooth feeding, minimising contamination or unfolding risk if dropped.
- Compact and Portable: Designed for ease of storage while being large enough to cover substantial wounds. Space-saving z-fold 11cm x 375cm design – vacuum packed with quick-tear notches for fast deployment.
- Multi-Use: Ideal for controlling severe bleeding, packing, and dressing wounds.
- Used by Professionals: Trusted by military medical personnel and emergency responders.
Traumafix Tactical Compressed Gauze is an essential addition to your kit to stop severe bleeding and protecting wounds in critical situations.
-
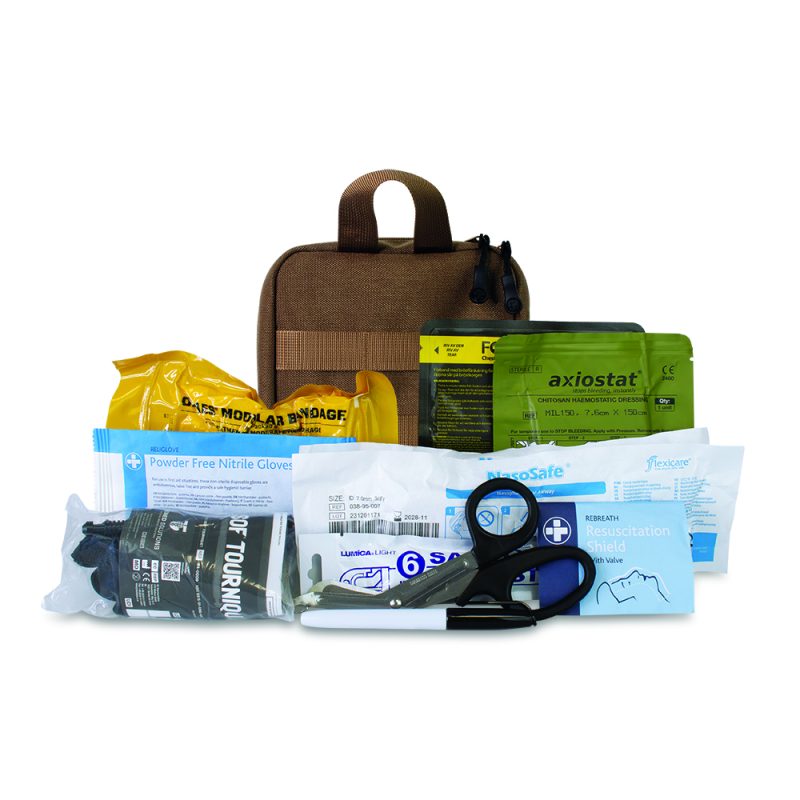
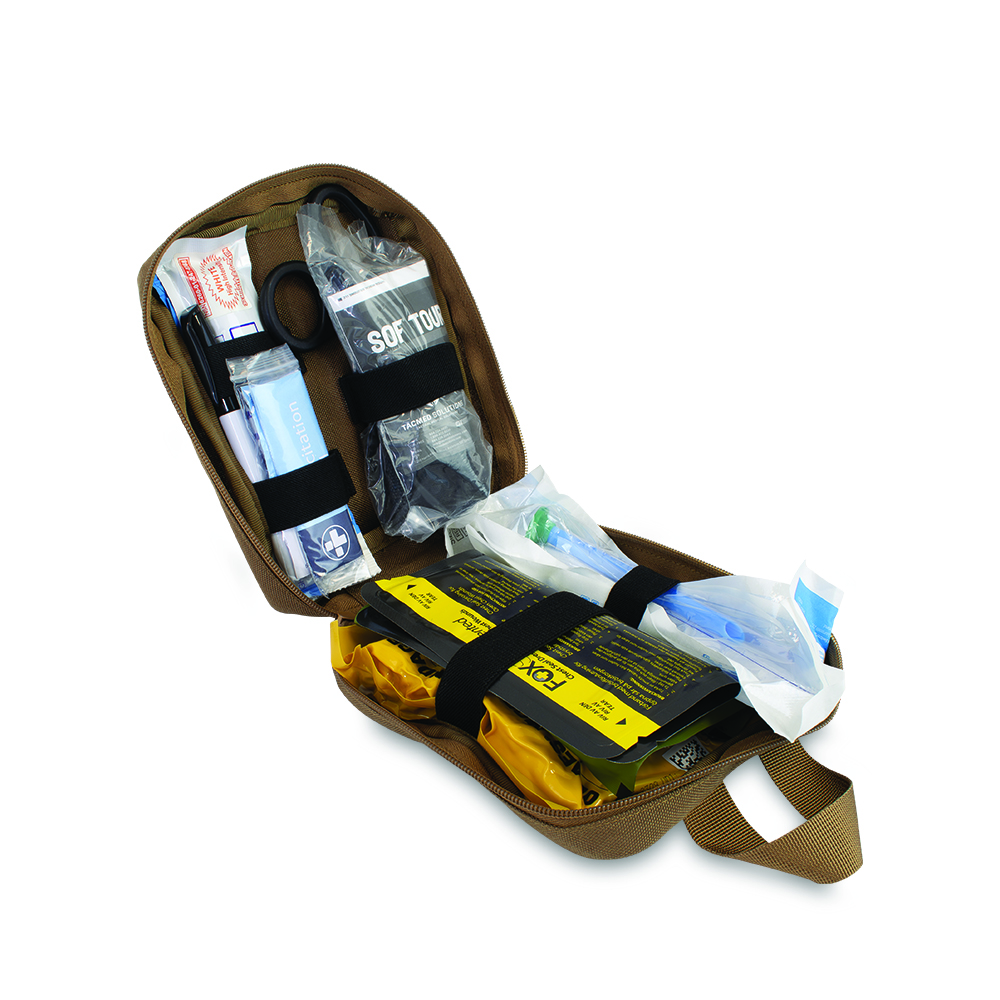
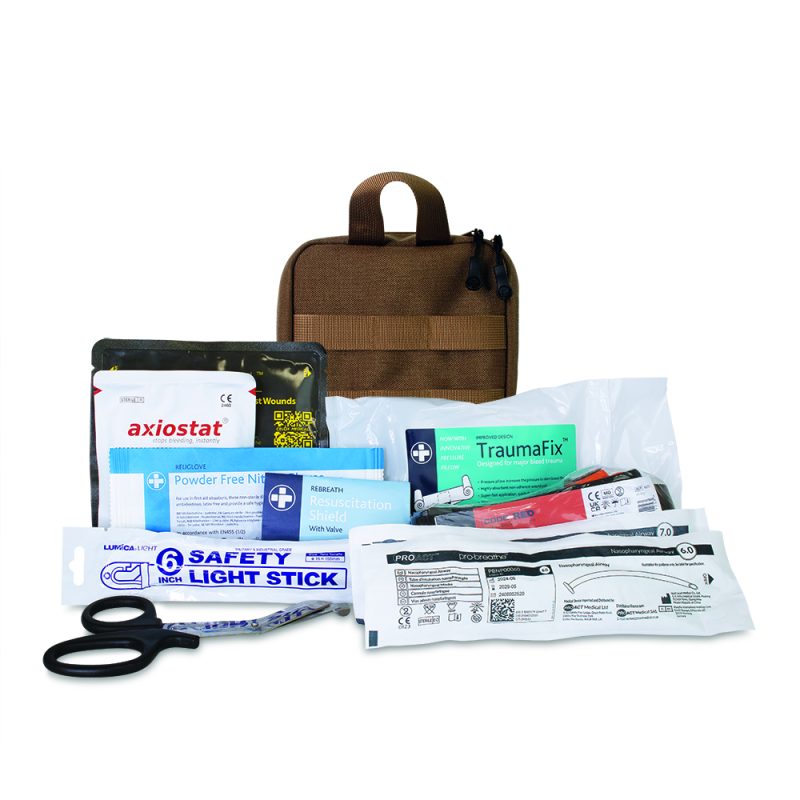
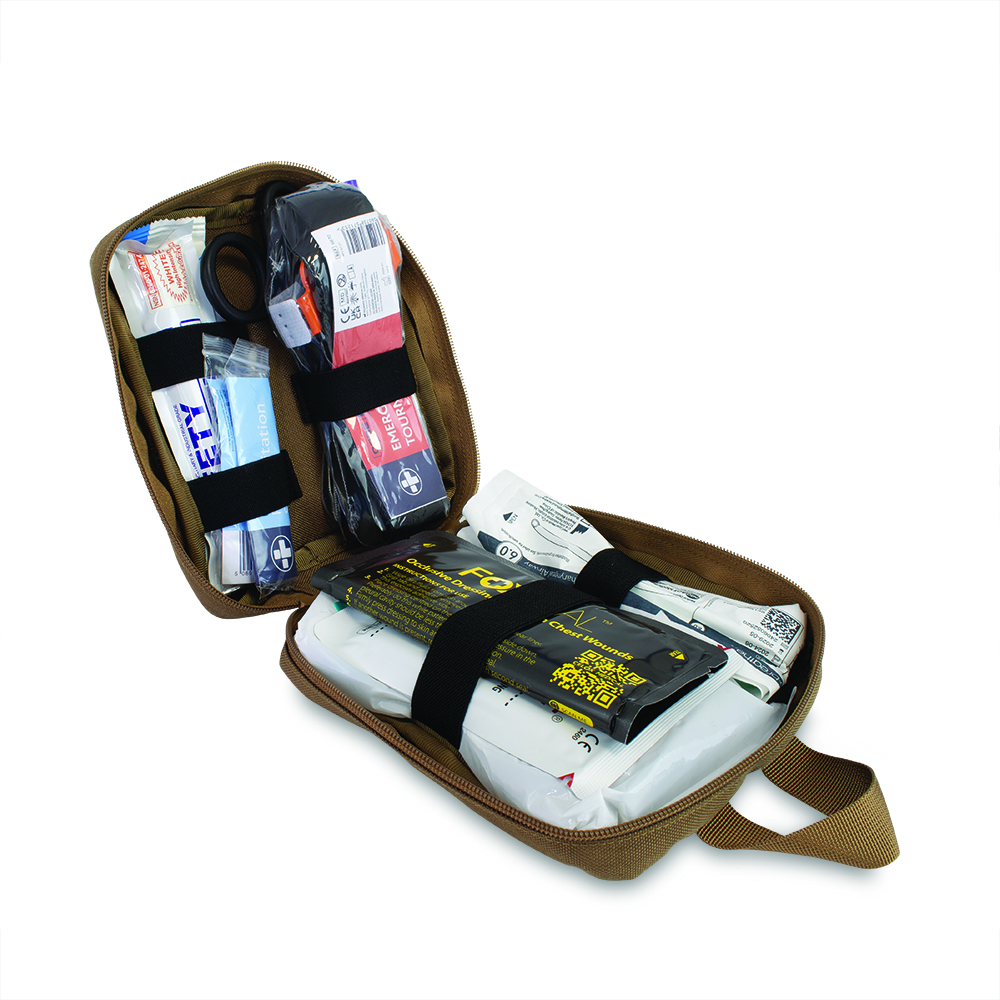
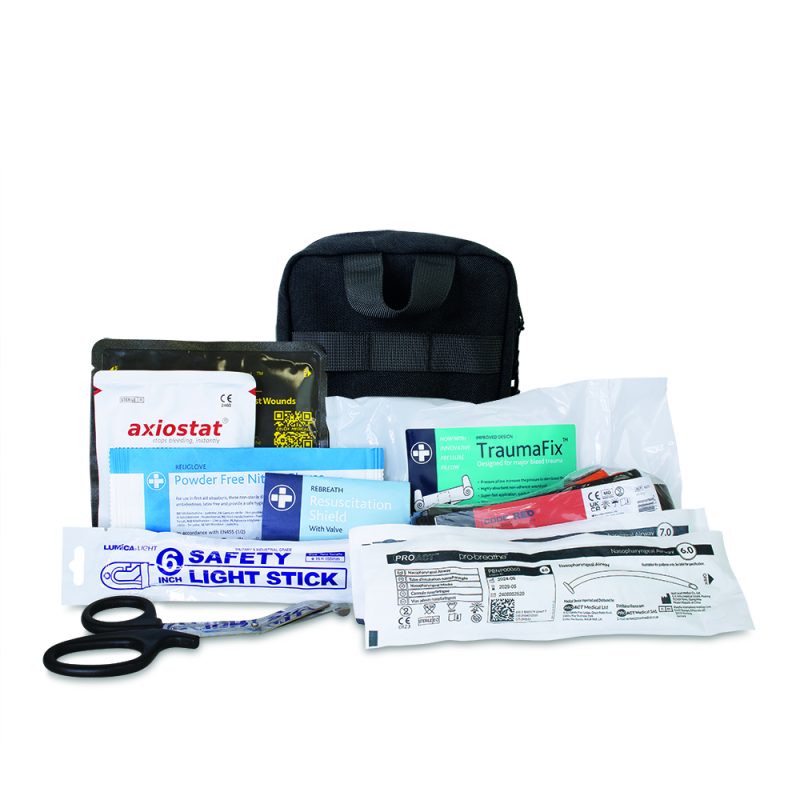
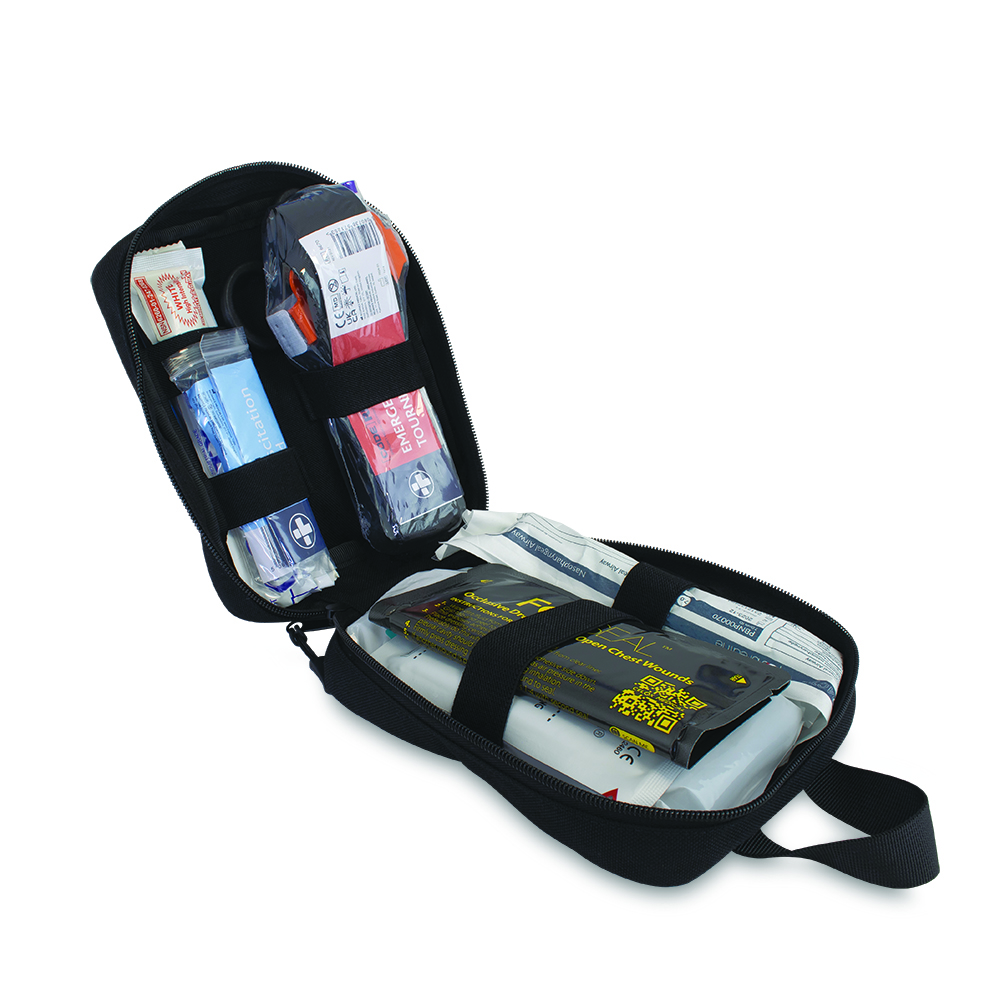
TraumaFix IFAK – Pro – Coyote
Compact and Portable: Easily attach to your belt or gear for quick access.
Vital Equipment: Contains essential tools to control bleeding, maintain airways, and stabilise patients.
Durable and Reliable: Built to withstand demanding conditions and provide reliable performance.
-
TraumaFix IFAK – Coyote
Compact and Portable: Easily attach to your belt or gear for quick access.
Vital Equipment: Contains essential tools to control bleeding, maintain airways, and stabilise patients.
Durable and Reliable: Built to withstand demanding conditions and provide reliable performance.
-
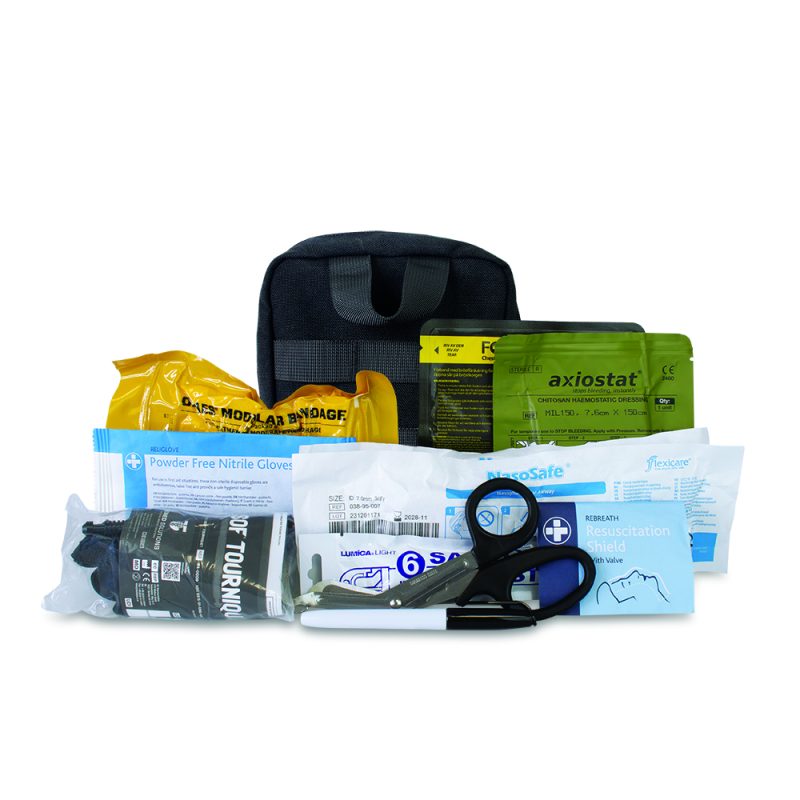
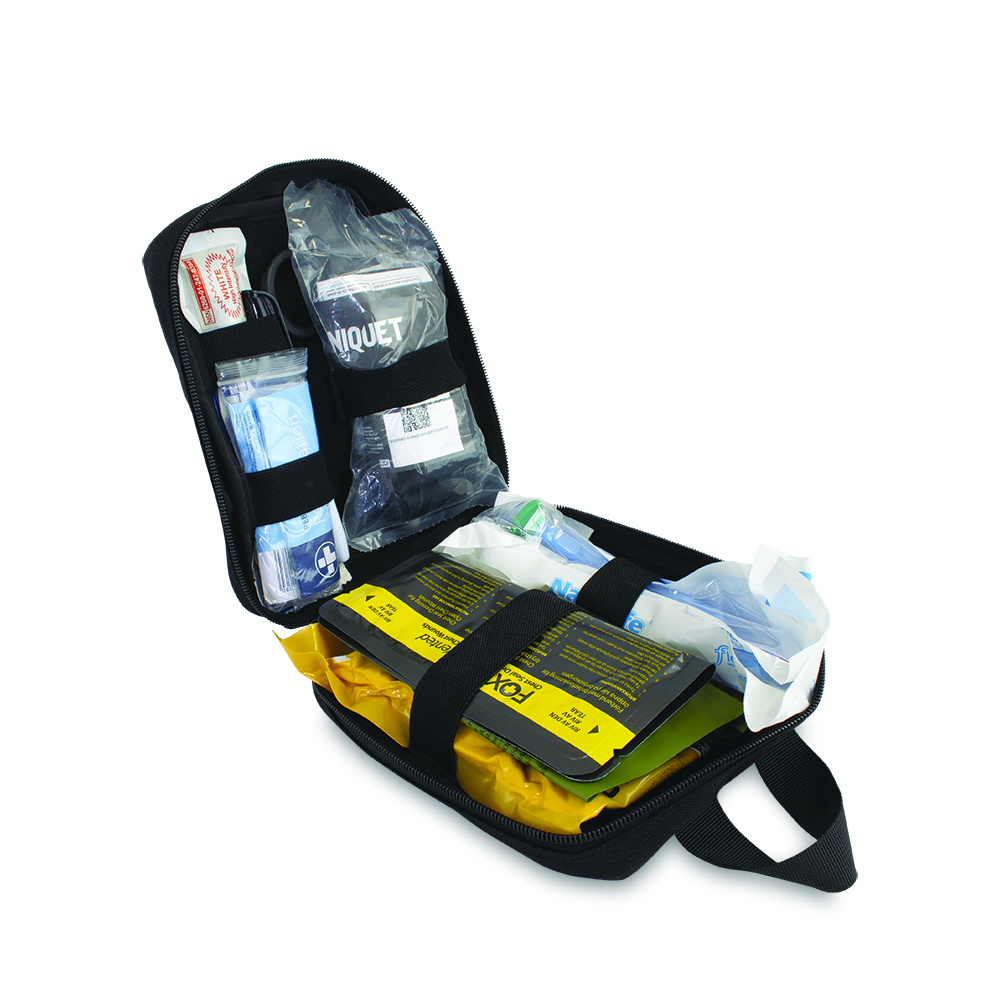
TraumaFix IFAK – Pro – Black
Compact and Portable: Easily attach to your belt or gear for quick access.
Vital Equipment: Contains essential tools to control bleeding, maintain airways, and stabilise patients.
Durable and Reliable: Built to withstand demanding conditions and provide reliable performance.
-
TraumaFix IFAK – Black
Compact and Portable: Easily attach to your belt or gear for quick access.
Vital Equipment: Contains essential tools to control bleeding, maintain airways, and stabilise patients.
Durable and Reliable: Built to withstand demanding conditions and provide reliable performance.
-
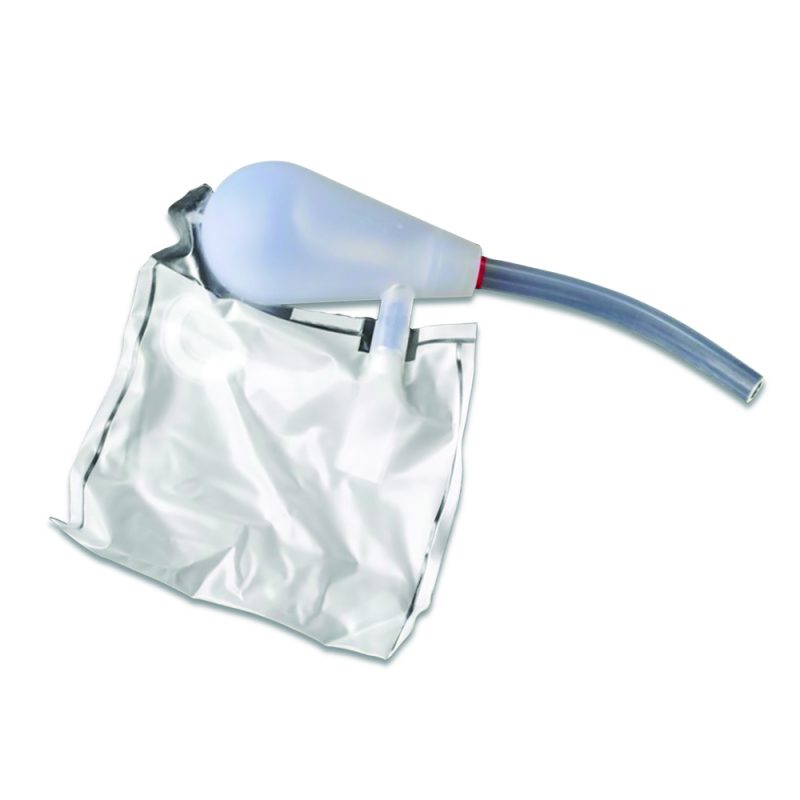
Tytek TVAC Manual Suction Unit
• Strong, silicone bulb creates vacuum pressure of approx. 110 mmHg Collection bag volume >1,000ml
• Resilient, reliable silicone bulb prevents loss of suction in even the harshest climates
• Contoured suction tube tip prevents tissue damage during application
• Simple disposal eliminates cross contamination concerns -
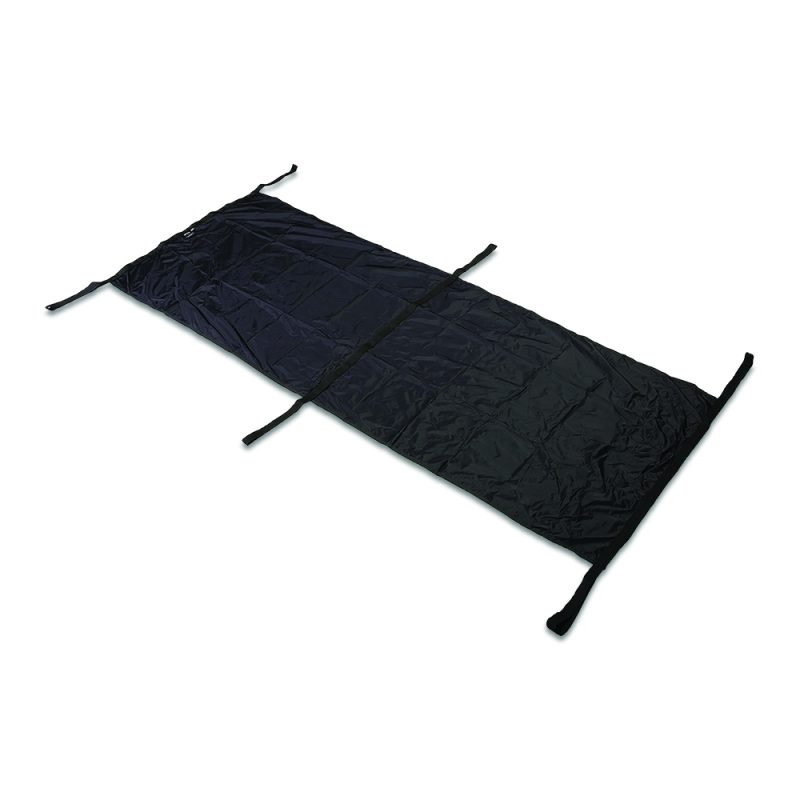
TacMed Ultralight Poleless Litter – Black
The Ultralight Poleless Litter is an ultra-compact, multi-use casualty evacuation platform designed for medical operators or individual soldiers.
-
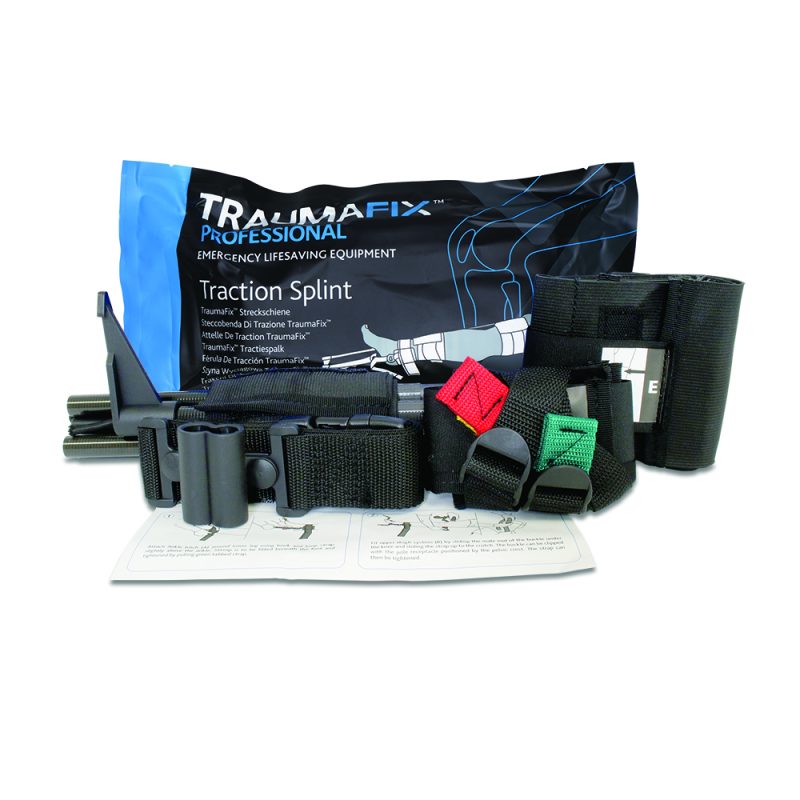
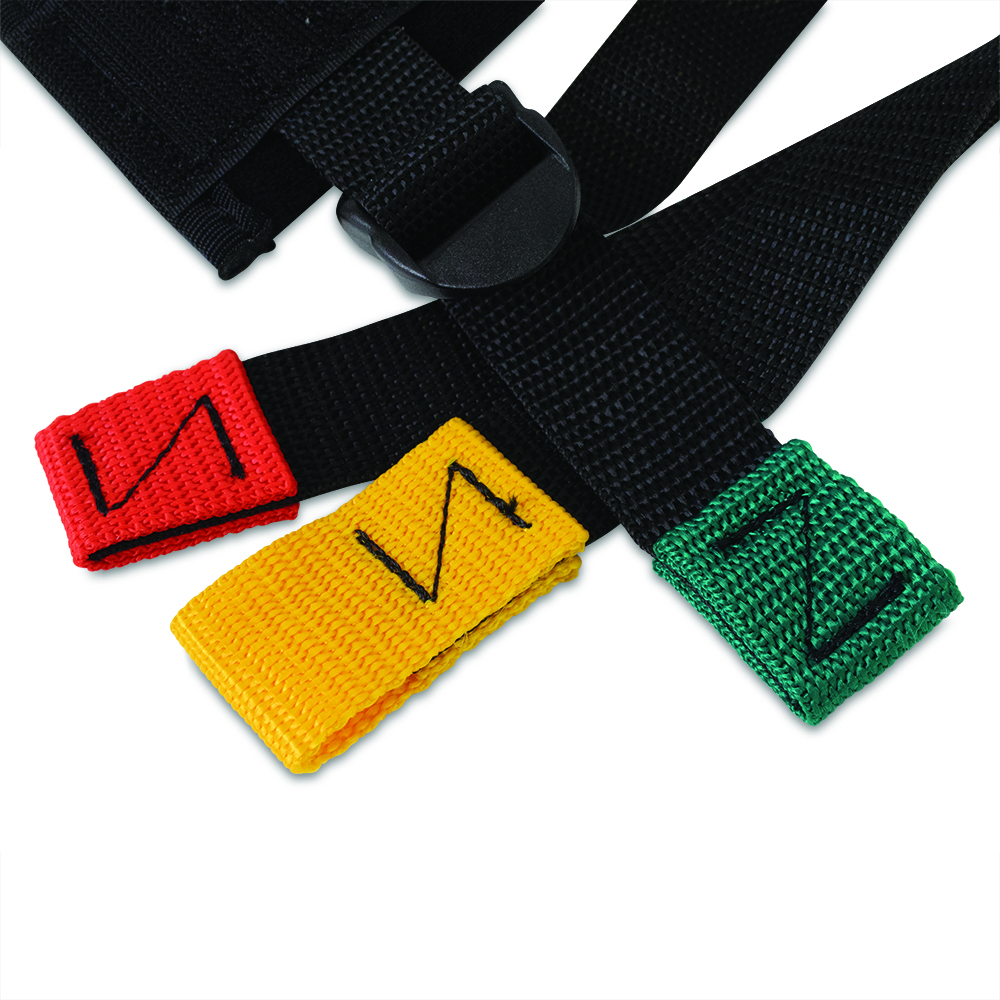
TraumaFix Traction Splint
Prevents Further Injury: Stabilises the fracture and reduces the risk of complications.
Essential for Emergency Response: Designed to provide immediate critical care in trauma situations. The Traumafix Traction Splint can be used in conjunction with spine boards and board splints and is MRI and X Ray safe.
Easy to Apply: Designed for rapid deployment in an emergency with clearly labelled components.
Designed for all: With fully adjustable straps and pole, the Traumafix Traction Splint is designed for patients of all sizes, suitable for use on adults and children alike. -
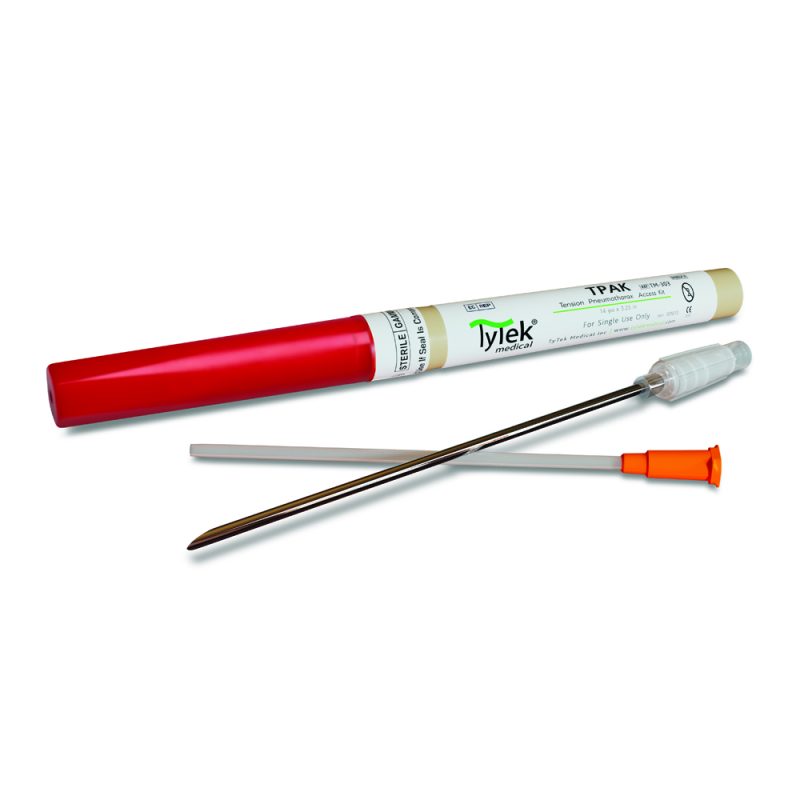
TyTek TPAK Decompression Needle 14G x 3.25″
- 14 gauge x 3.25” chest decompression needle
- Strong, reliable tension pneumothorax needle allows for secure placement of catheter for continuous relief during needle thoracostomy
- Rugged tube with textured, easy-open hex cap
- Capless flash chamber for instant confirmation of needle placement
- Convenient, compact size for maximum portability
- Shock resistant, precision dimensioned case and needle hub ensure that chest decompression needle and catheter secure upon deployment for safety
-
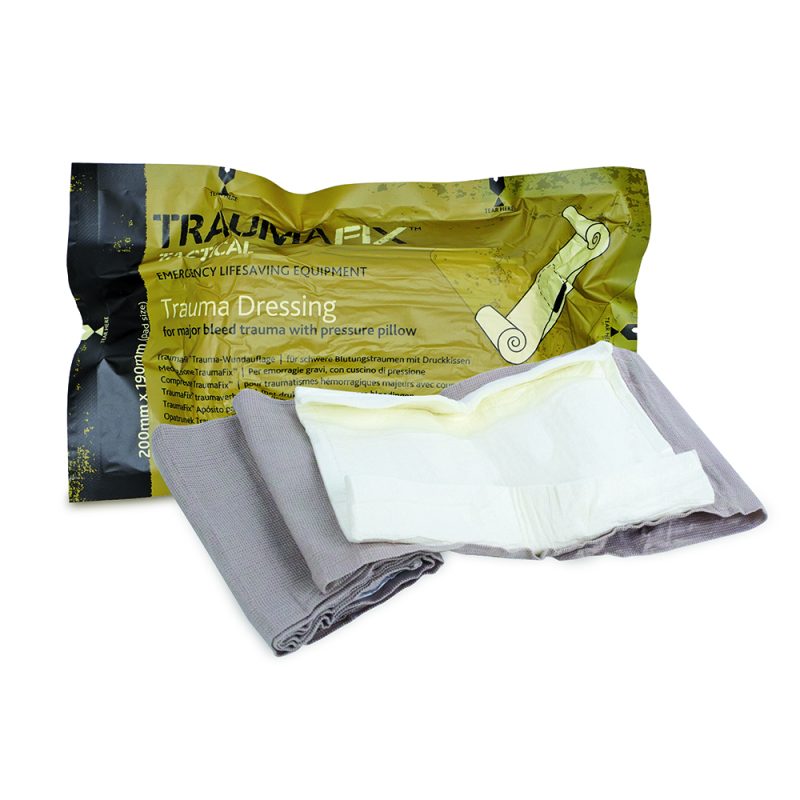
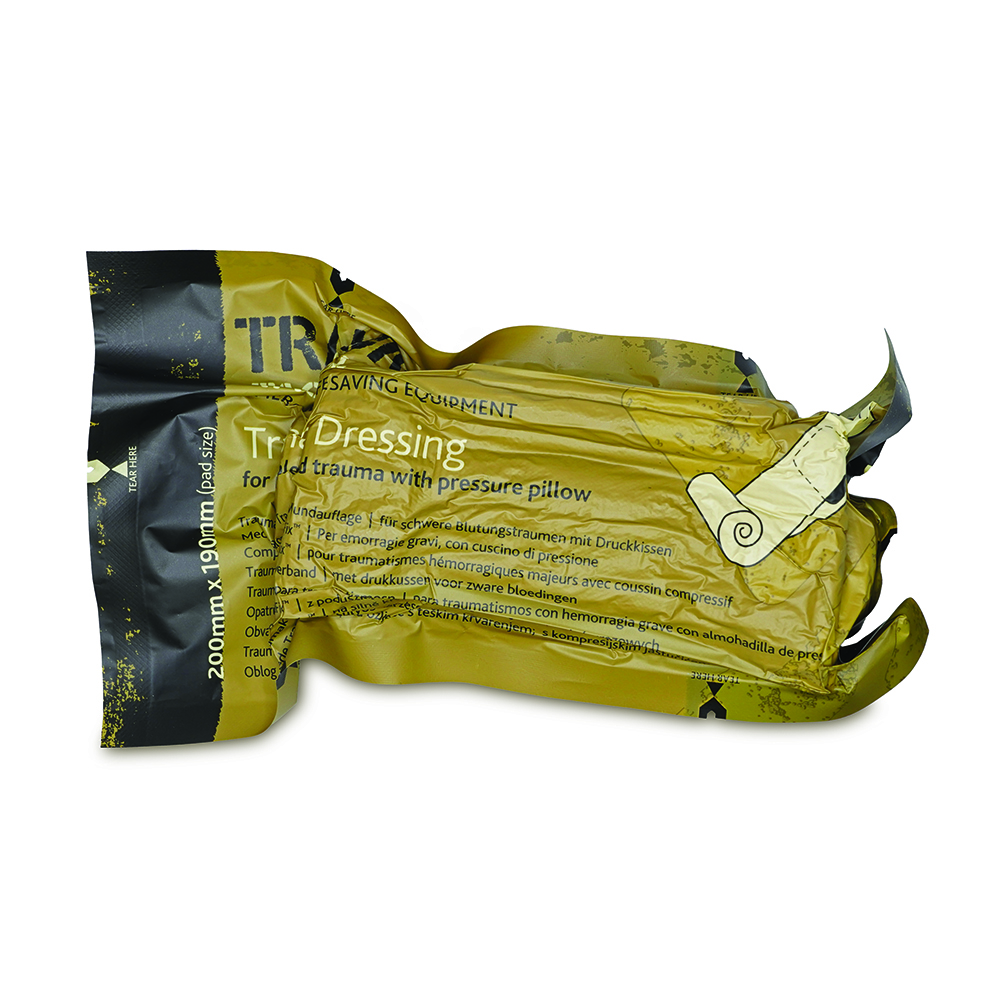
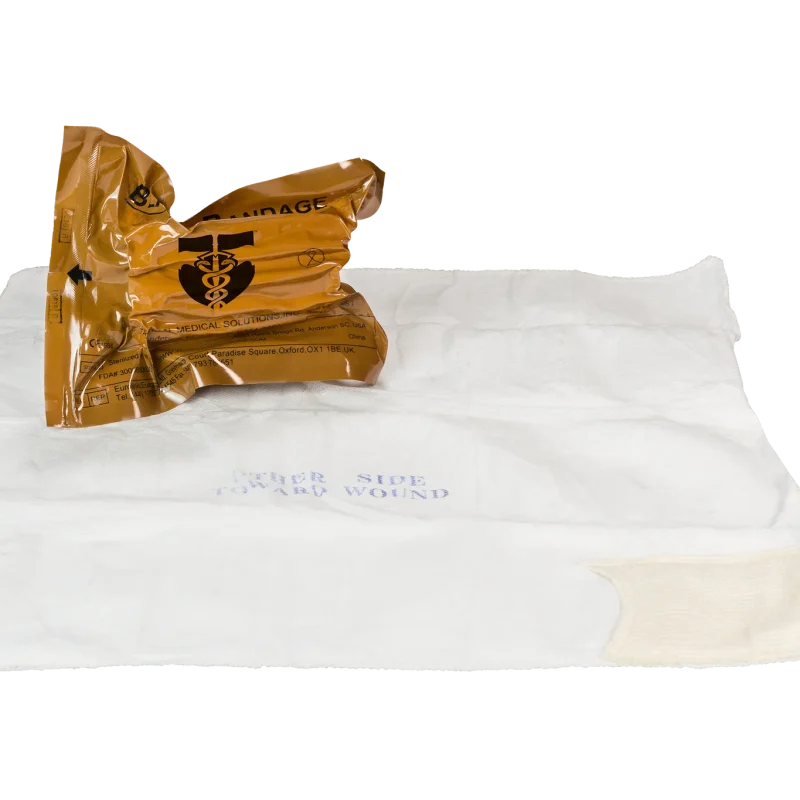
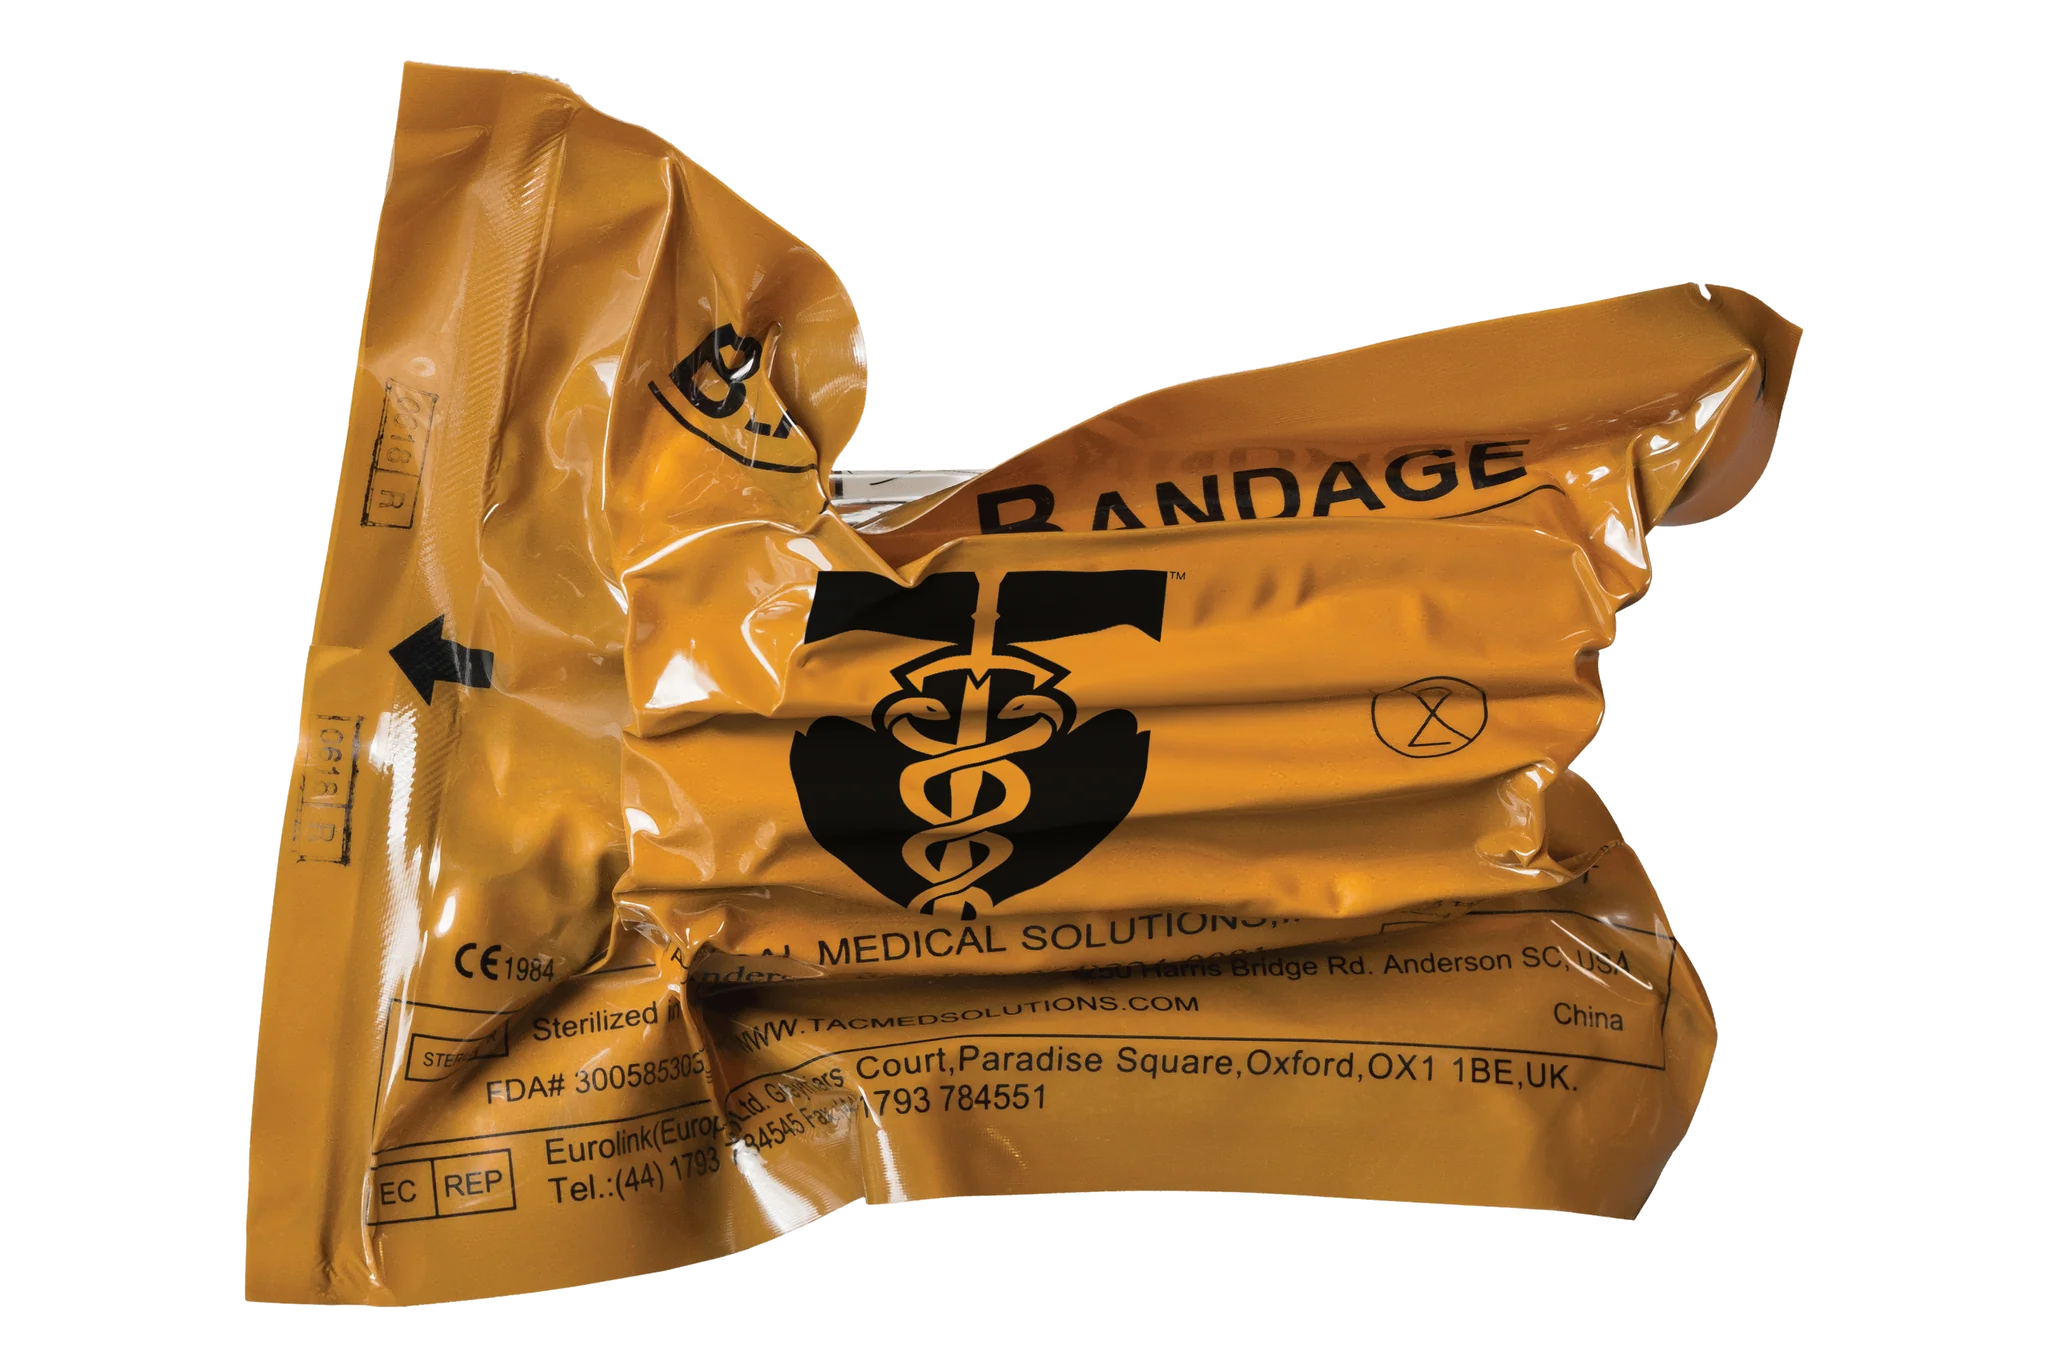
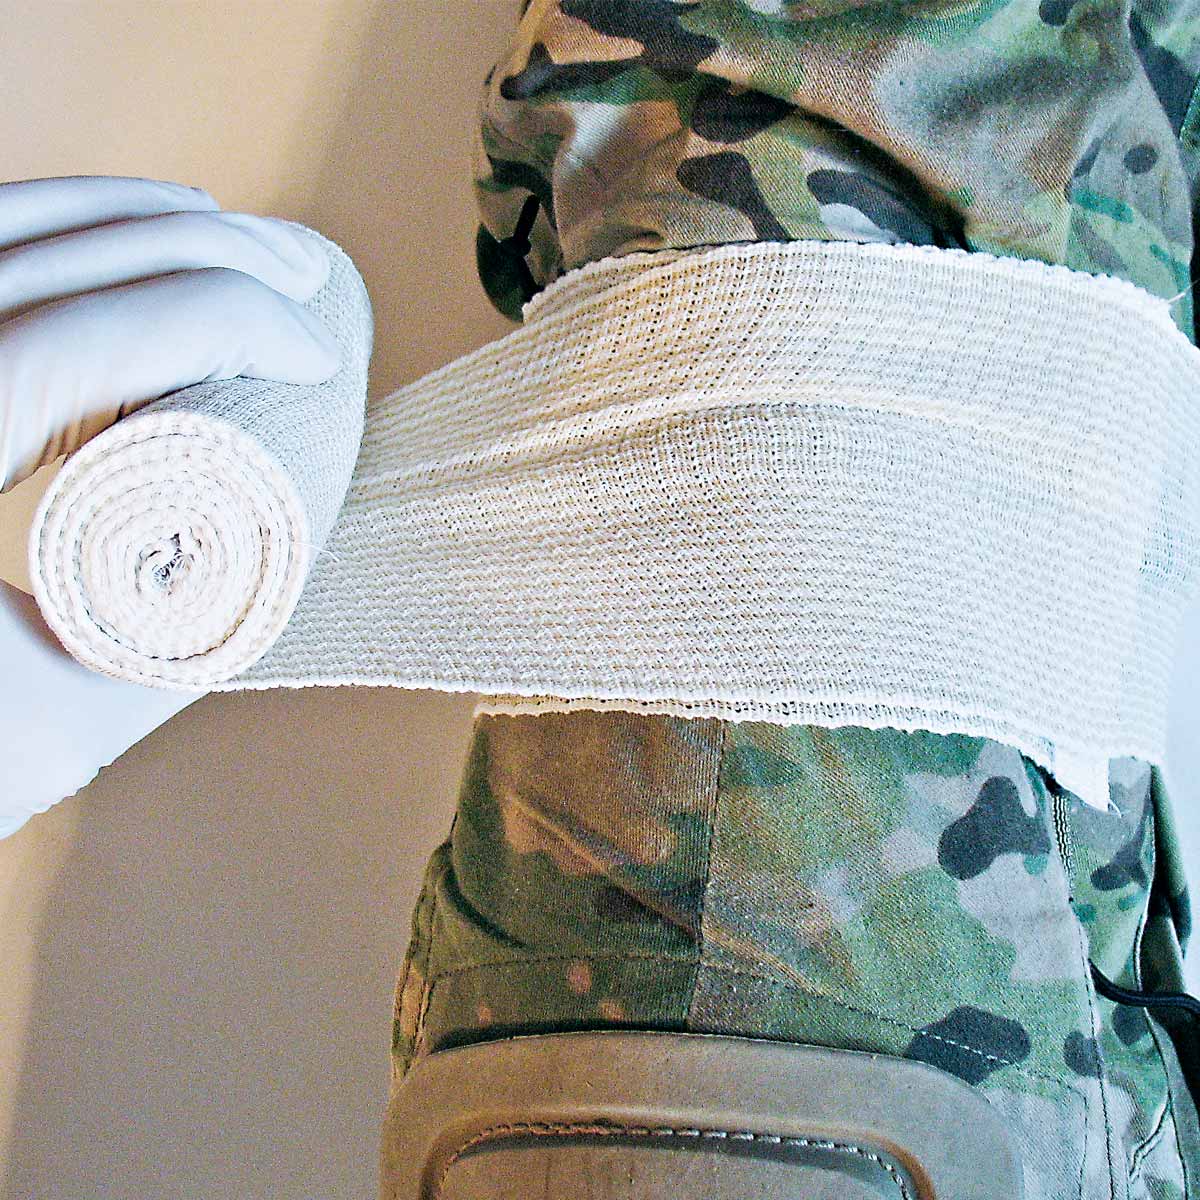
TraumaFix Tactical Trauma Dressing – 20cm x 19cm
New and improved Sterile dressing designed for major bleed trauma.
• Integrated Pressure Pad: Features a large dressing with stitched in pressure pad, combined with a pressure bandage to stop severe bleeding quickly.
• User-Friendly Design: Hooped tail allows for one-handed application—ideal for self-use or use in high-stress environments.
• Anti-Unravel System: Hook and loop spots along the bandage help maintain secure placement throughout use.
• Space-Saving Packaging: Easy-tear, vacuum-sealed design for efficient storage and rapid deployment. -
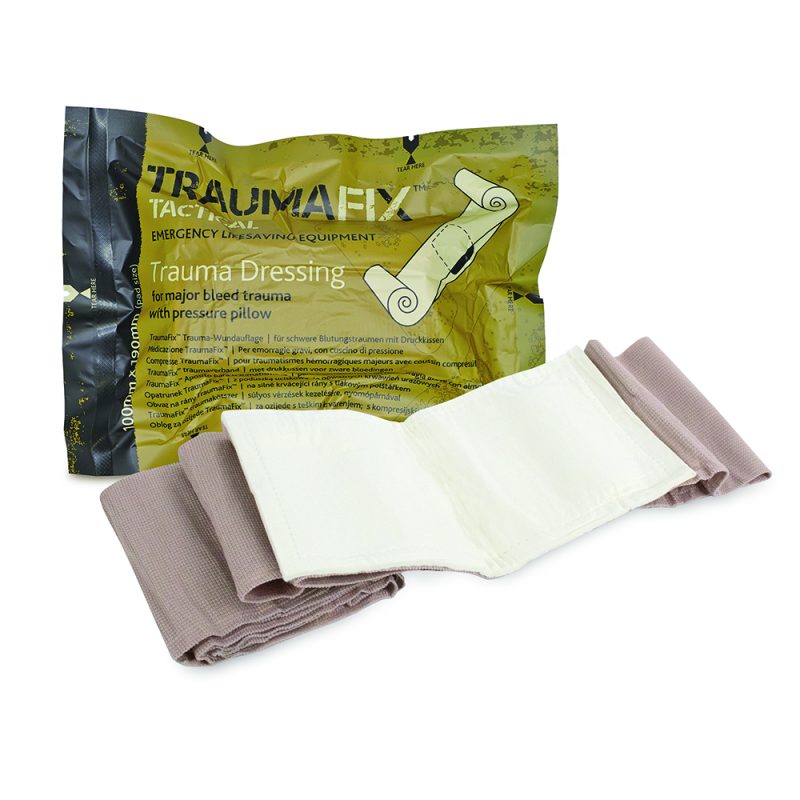
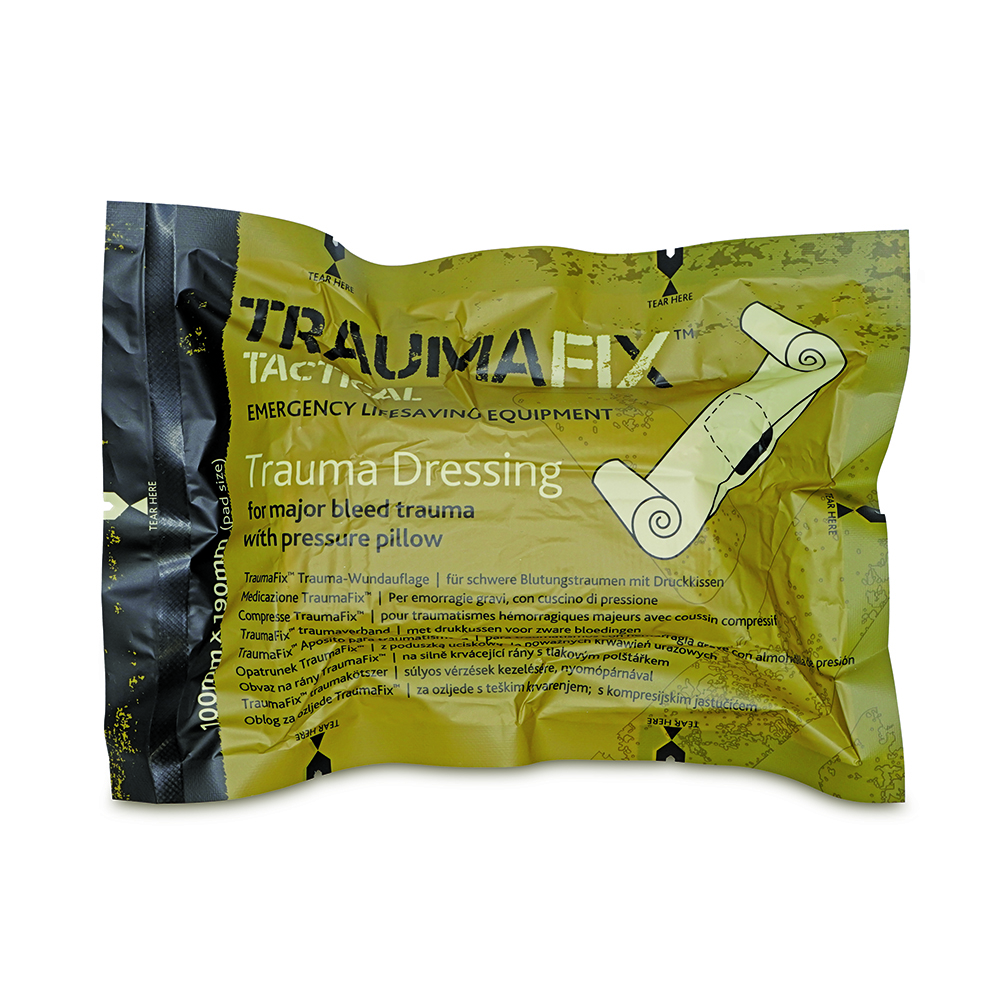
TraumaFix Tactical Trauma Dressing – 10cm x 19cm
New and improved Sterile dressing designed for major bleed trauma.
• Integrated Pressure Pad: Features a large dressing with stitched in pressure pad, combined with a pressure bandage to stop severe bleeding quickly.
• User-Friendly Design: Hooped tail allows for one-handed application—ideal for self-use or use in high-stress environments.
• Anti-Unravel System: Hook and loop spots along the bandage help maintain secure placement throughout use.
• Space-Saving Packaging: Easy-tear, vacuum-sealed design for efficient storage and rapid deployment. -
TraumaFix Bleed Control Kit in Titan Box – Small – Red
- Supplied in a Red Bleed Control Kit Titan box which is 100% recycled and recyclable
- Also available in a Red Bleed Control Kit bag
-
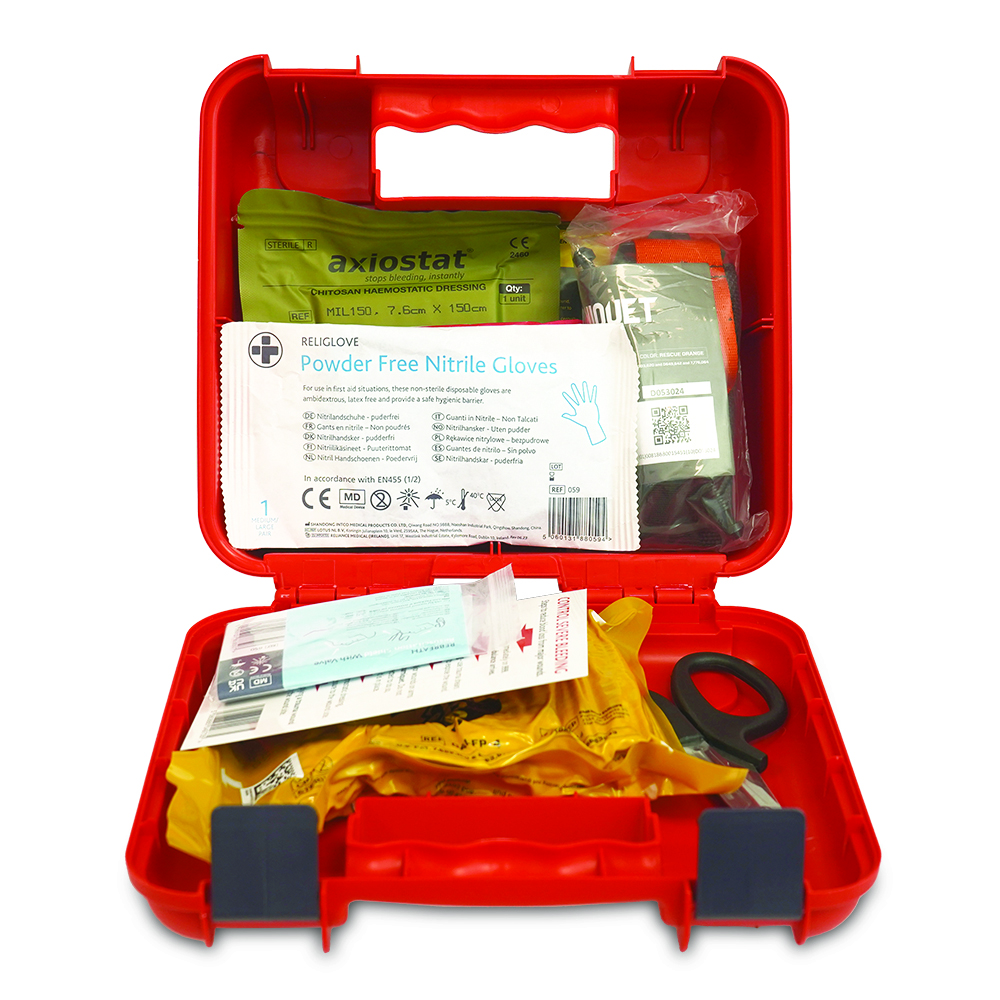
TraumaFix Bleed Control Kit – Pro in Titan Box – Small – Red
- Supplied in a Red Bleed Control Kit Titan box which is 100% recycled and recyclable
- Also available in a Red Bleed Control Kit bag
-
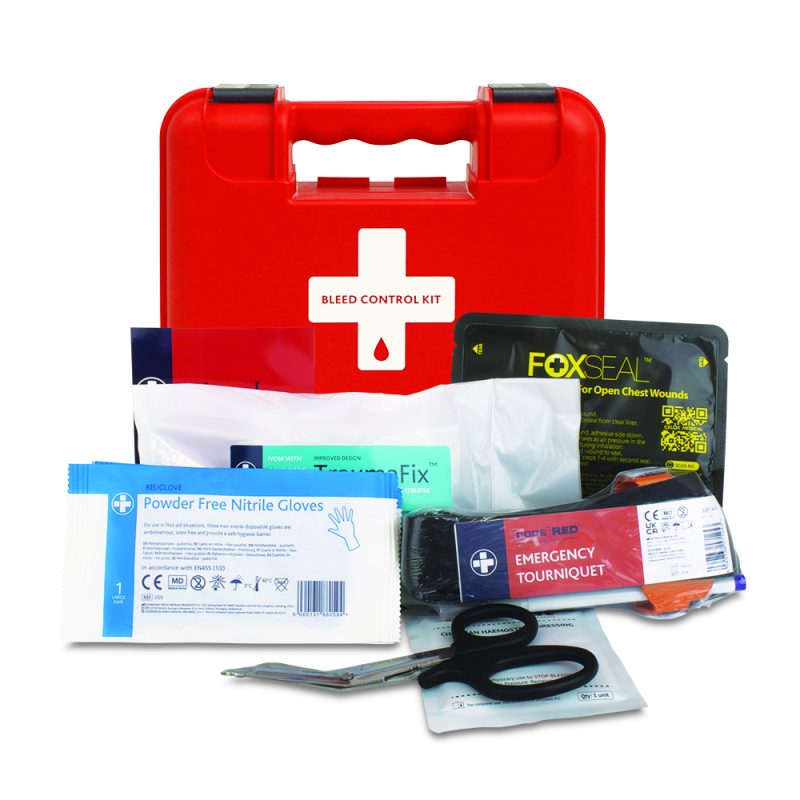
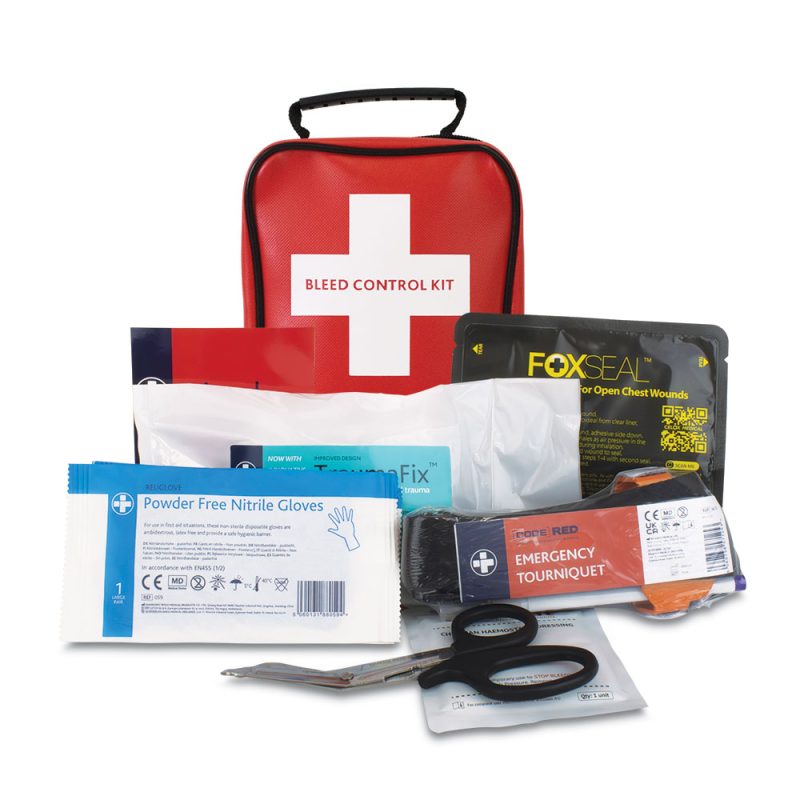
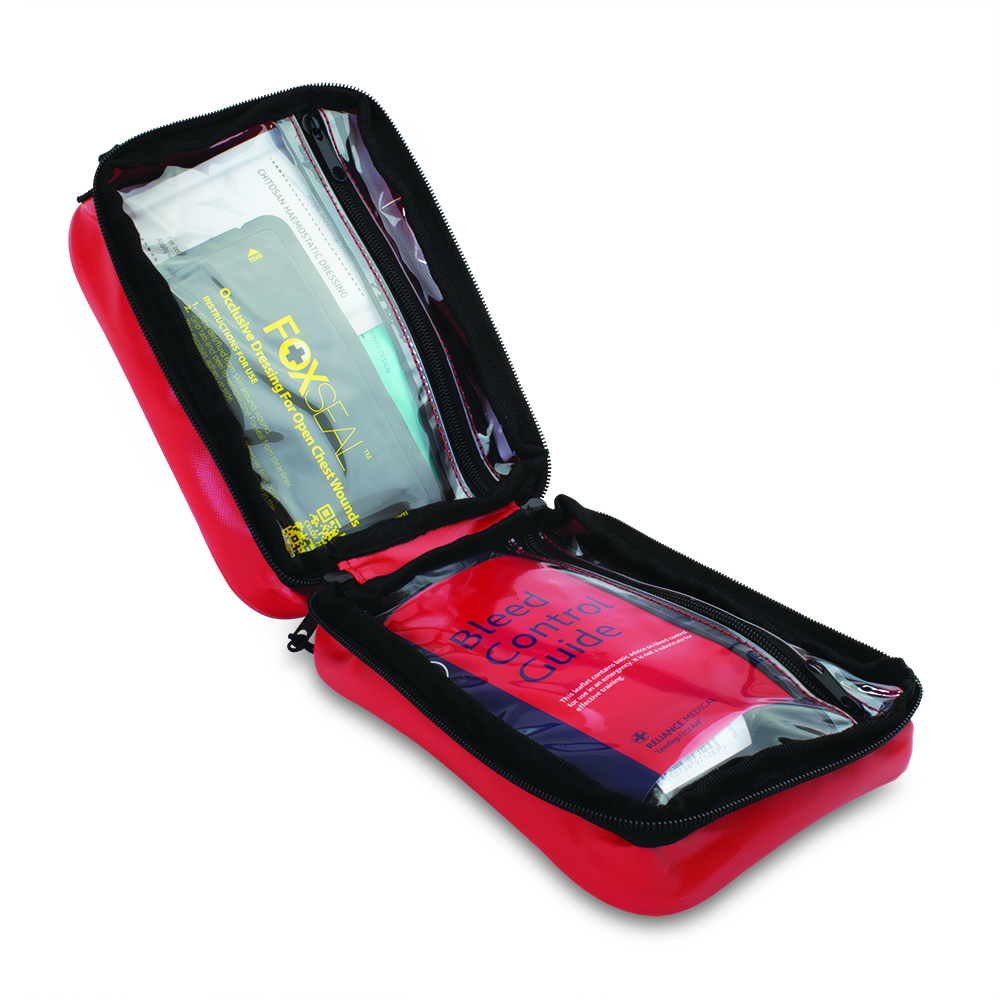
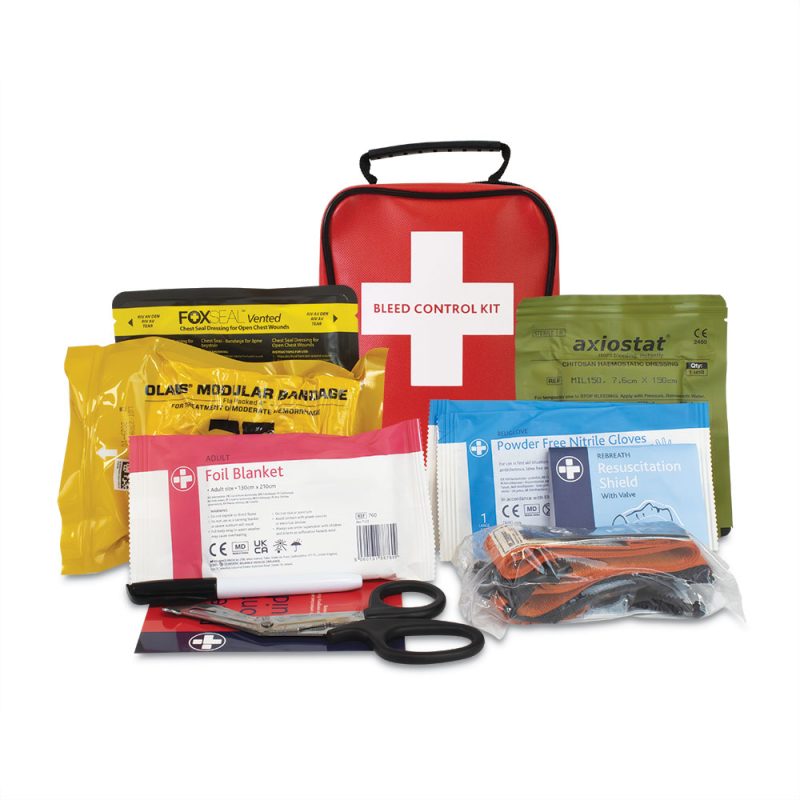
TraumaFix Bleed Control Kit
- Supplied in a Red Bleed Control Kit bag
- Also available in a Red Bleed Control Kit Titan box which is 100% recycled and recyclable
-
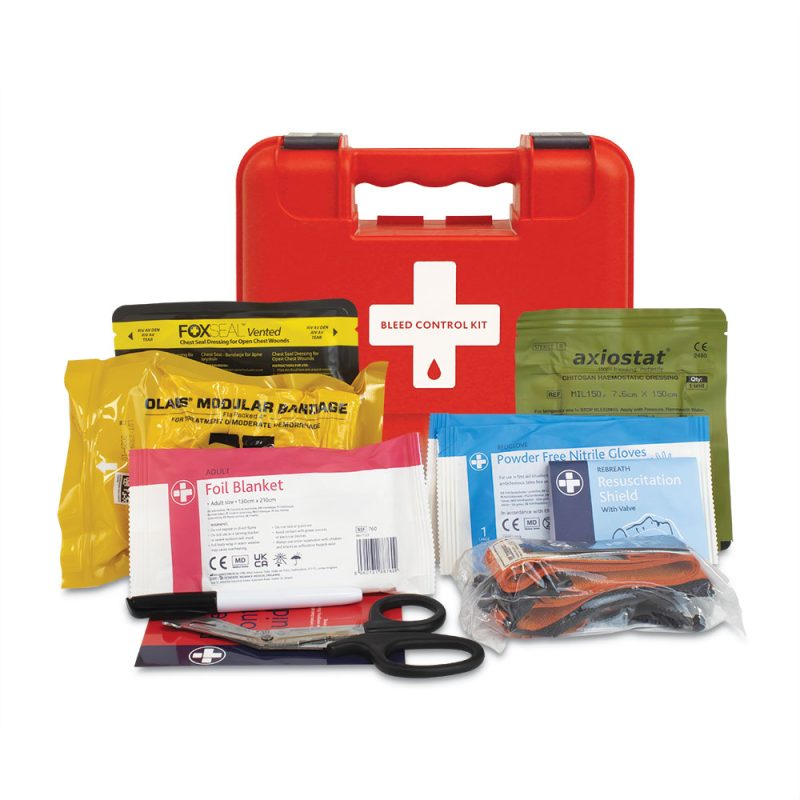
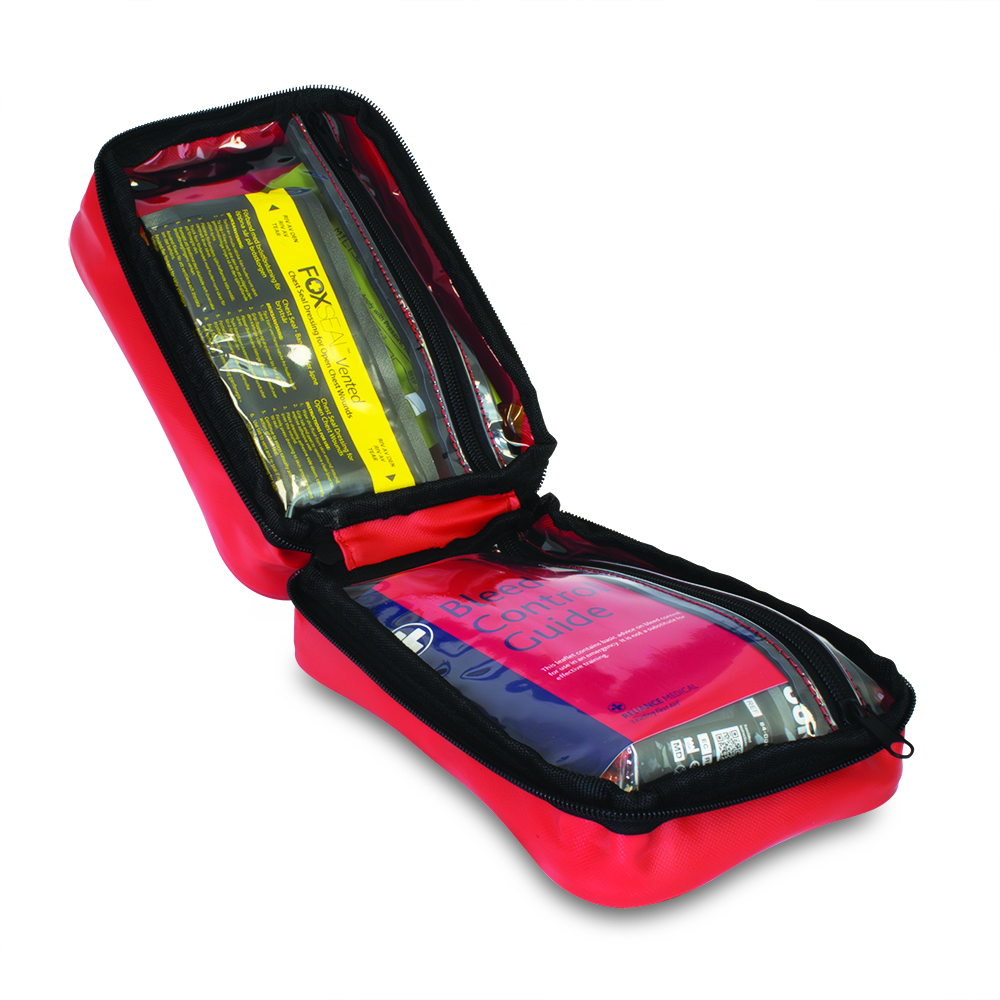
TraumaFix Bleed Control Kit – Pro
- Supplied in a Red Bleed Control Kit bag
- Also available in a Red Bleed Control Kit Titan box which is 100% recycled and recyclable
-
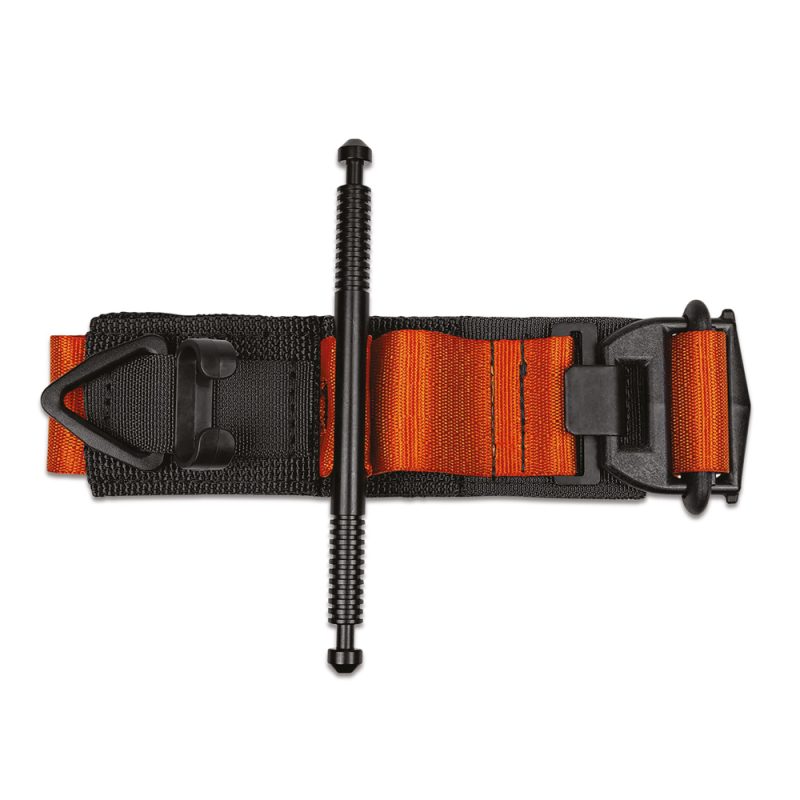
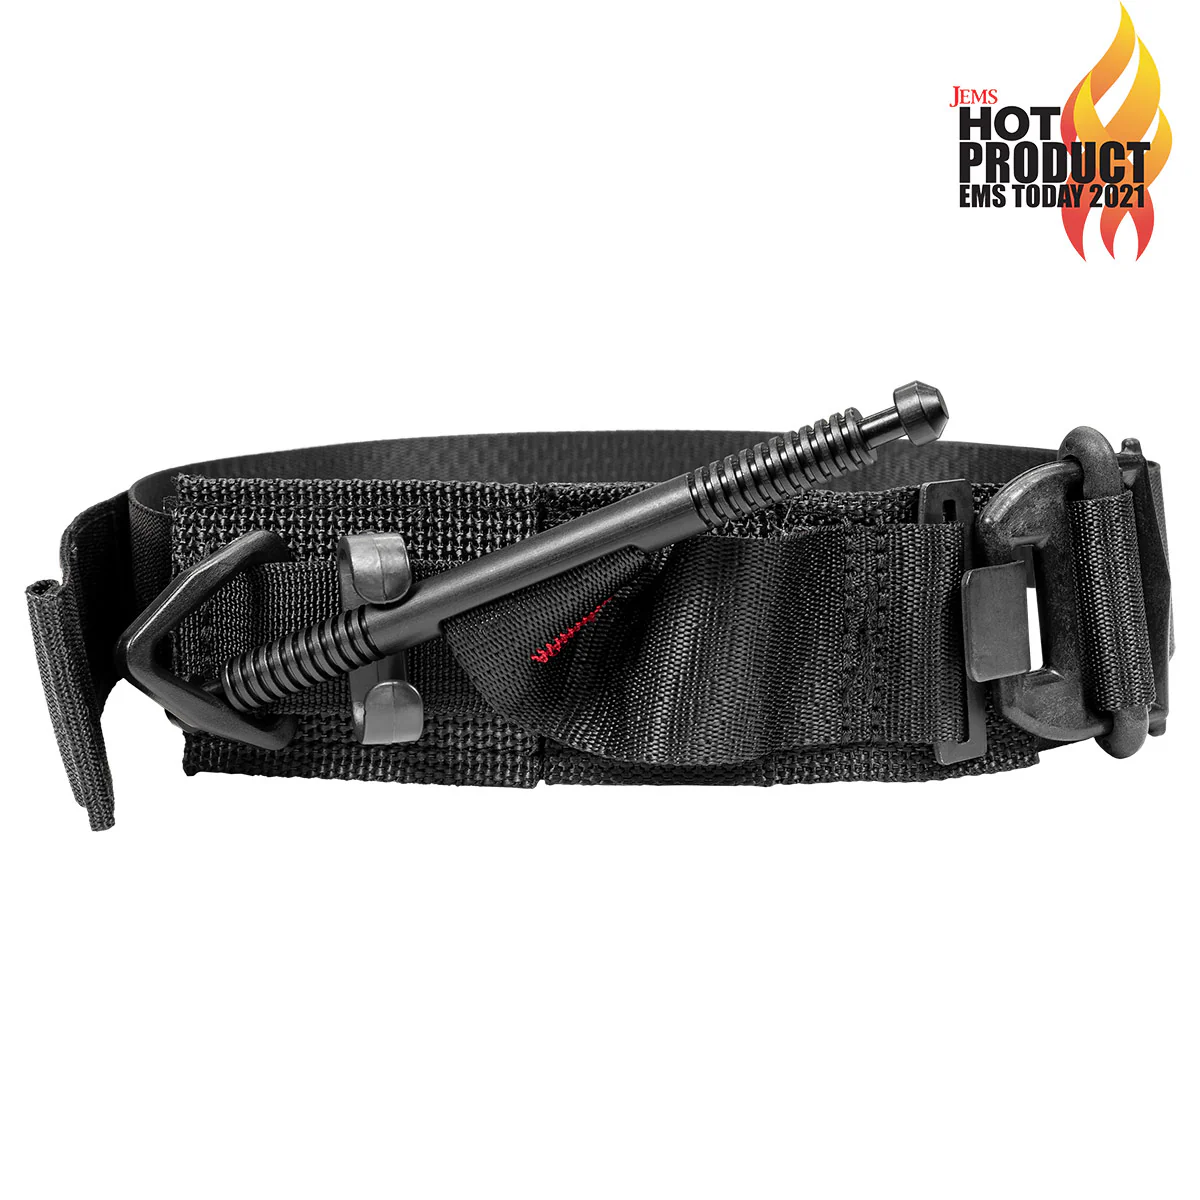
TacMed SOF Tourniquet – Orange
• PERFORMANCE COMPRESSION BAND – Reinforced polyester webbing that maximises compression and speed of application. At a true 1.5″ width, the material smoothly glides through the Rugged Buckle for easy and effective one-handed and two-handed applications.
• RUGGED BUCKLE – Engineered to remove excess slack in a single fluid motion, the buckle’s shape stabilises the Performance Compression Band at any angle of engagement. The Rugged Buckle is an advanced, lightweight composite design with superior strength over previous versions.
• SLACK INDICATOR WEDGE – Stitched into the Performance Compression Band below the windlass, the contrasting wedge offers a visual confirmation you have pulled all excess slack from the band. This is a critical step for proper tourniquet application and results in fewer required windlass rotations to reach occlusion.
• HIGH-STRENGTH ALUMINIUM WINDLASS – Machined from a single aircraft-grade aluminium bar stock, the 5.5″ windlass features signature conical ends and grip-friendly texture for consistent torque. Its anodized finish minimises impacts from environmental elements for durability in any scenario.
• REINFORCED TOURNIQUET RETENTION ASSISTANCE CLIP (TRAC) – Conveniently holds the windlass in place until you can secure it into the Tri-Ring Lock- even under extreme lateral loads. The TRAC provides steady handling during tough applications and enhances control for one-handed manoeuvres.
• TRI-RING LOCK – Complete the tourniquet application by securing the windlass into the Tri-Ring Lock. It can easily be manipulated with just one hand and prevents the windlass from shifting during patient movement.
• TIME TAG – A tag for documenting the tourniquet application time. -
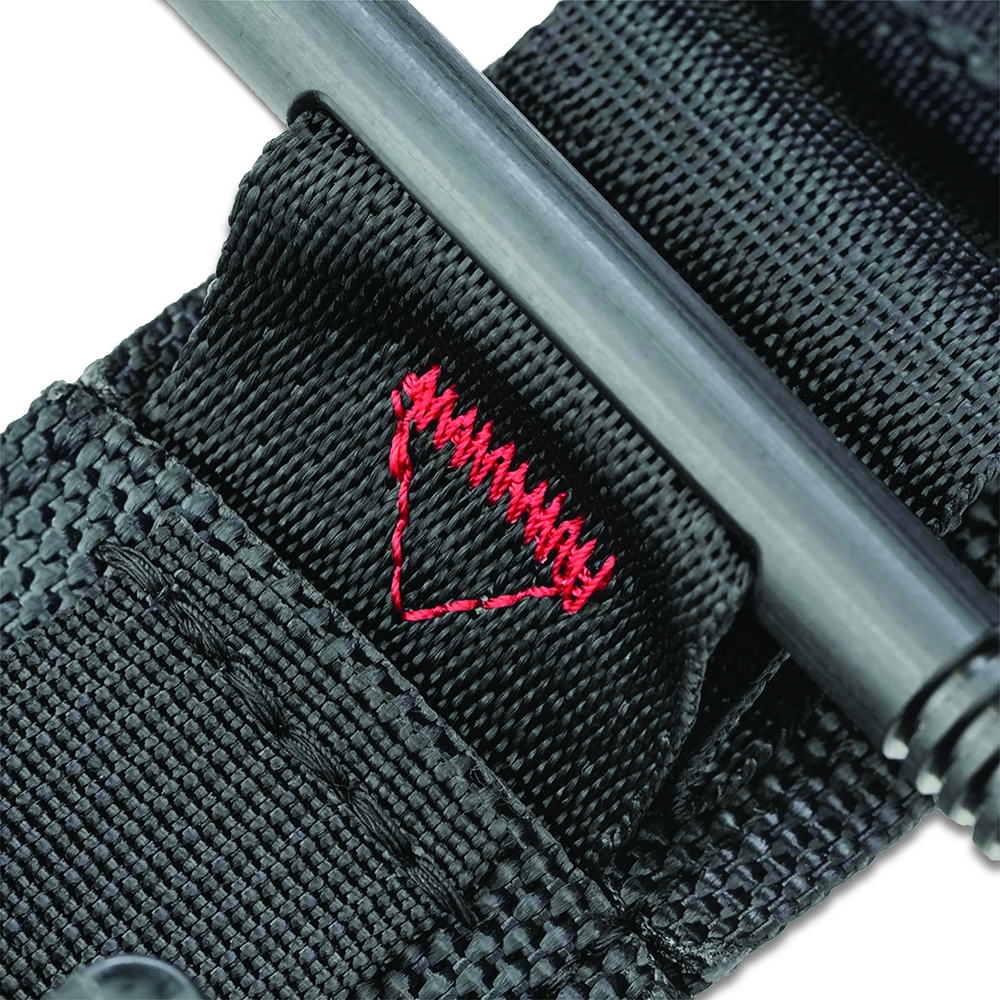
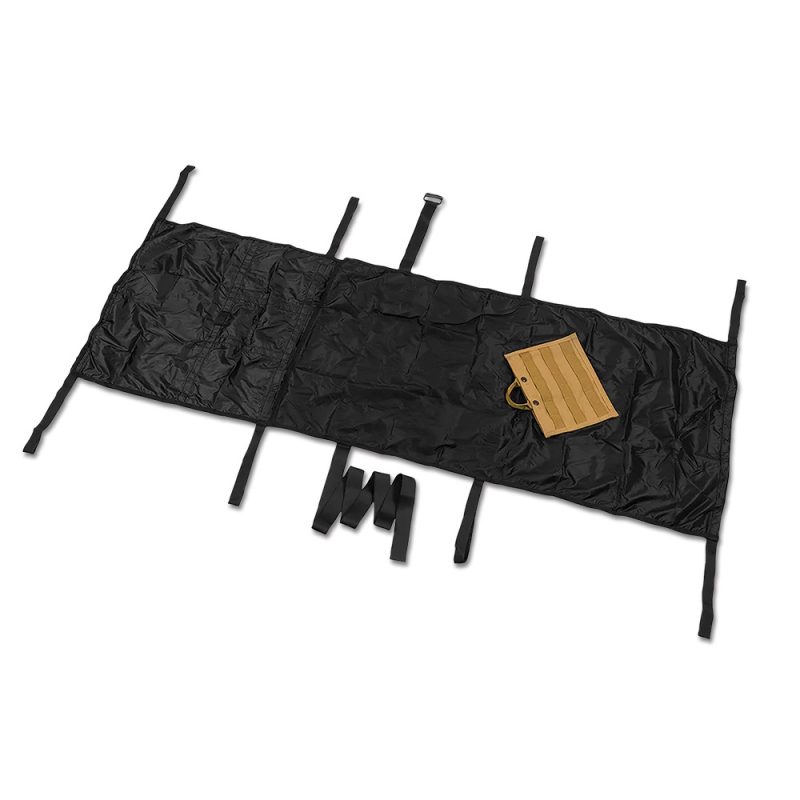
TacMed Foxtrot Litter and Carrier – DA – Black
• LIGHTWEIGHT AND COMPACT STORAGE – Weighing less than 5lbs when stored in its tactical carrier, it is easier to carry than a rigid litter system while being quickly opened for expedient casualty evacuations in a high stress environment.
• CARRYING HANDLES – 8 integrated handles create multiple grab points around the litter for efficiently carrying or dragging a casualty, which is especially useful in narrow passages.
• DRAG STRAP – Rigged to the litter, the rapid deployable drag strap allows a single user to easily transport a casualty while keeping their hands free to manipulate their weapon.
• COMPACT AND FLEXIBLE SIZE – Its compact size and semi-rigid structure allow a casualty to be sat up to make tight turns on stairwells and hallways whilst being small enough for easy transport through narrow passages and walkways such as on aircraft, buses, and trains.
• COLOUR-CODED DUAL-ADJUST BUCKLES – The quick secure straps with colour-coded side release buckles are easily adjustable for rapid casualty securement being accessible for further treatment. -
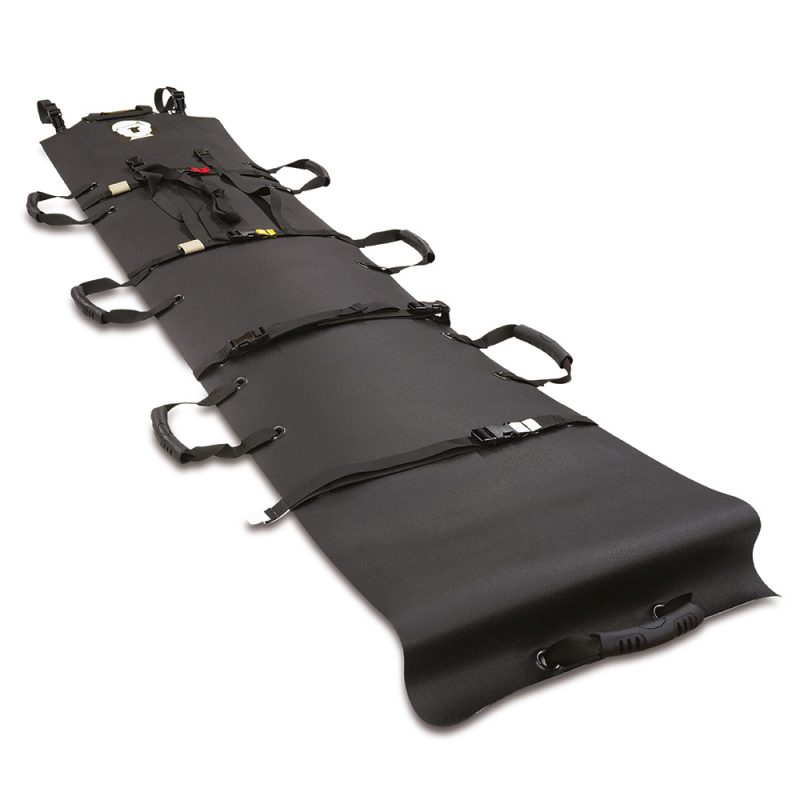
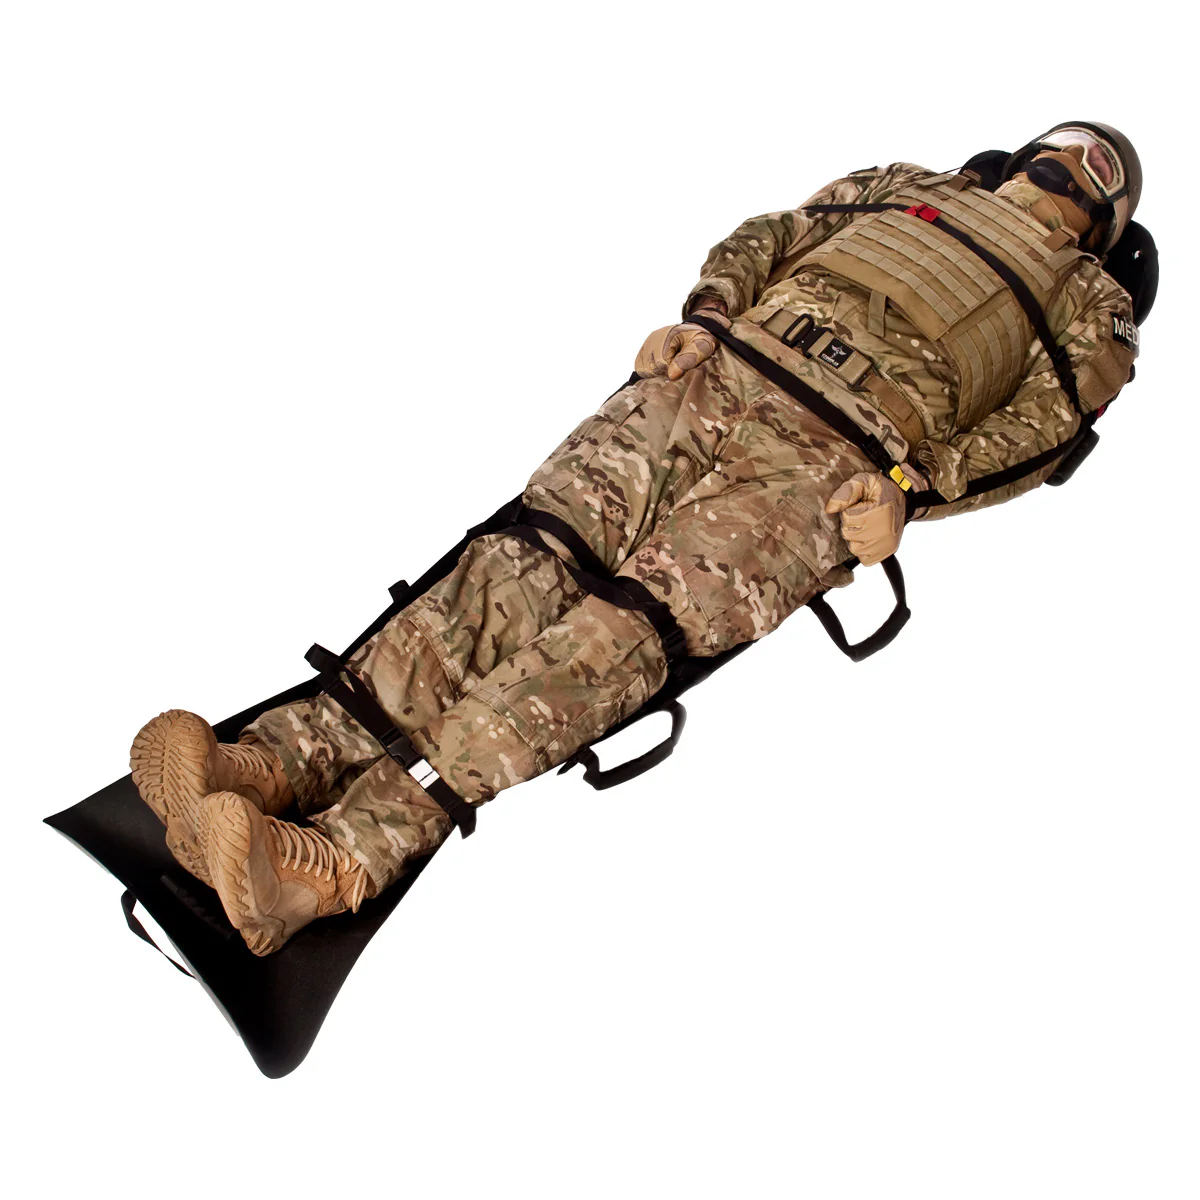
TacMed Phantom Litter with Carrier – Black
• HIGH STRENGTH MATERIAL CONSTRUCTION – Engineered to be rugged and durable. The litter showed no signs of damage when tested with a 500lb / 227kg static load for a 24-hour period.
• CARRYING HANDLES – 8 integrated carrying handles create ,multiple grab points for one or multiple operators to ease patient transport.
• PATIENT SECUREMENT – The 1.5″ securing straps with friction buckles allow for rapid casualty securement while being accessible for further treatment.
• MULTI-PURPOSE STORAGE – The litter can double as a casualty equipment bag after the casualty has been loaded on a standard litter to minimise the risk of equipment loss during the casualty evacuation process. -
TacMed SOF Tourniquet – Black
• PERFORMANCE COMPRESSION BAND – Reinforced polyester webbing that maximises compression and speed of application. At a true 1.5″ width, the material smoothly glides through the Rugged Buckle for easy and effective one-handed and two-handed applications.
• RUGGED BUCKLE – Engineered to remove excess slack in a single fluid motion, the buckle’s shape stabilises the Performance Compression Band at any angle of engagement. The Rugged Buckle is an advanced, lightweight composite design with superior strength over previous versions.
• SLACK INDICATOR WEDGE – Stitched into the Performance Compression Band below the windlass, the contrasting wedge offers a visual confirmation you have pulled all excess slack from the band. This is a critical step for proper tourniquet application and results in fewer required windlass rotations to reach occlusion.
• HIGH-STRENGTH ALUMINIUM WINDLASS – Machined from a single aircraft-grade aluminium bar stock, the 5.5″ windlass features signature conical ends and grip-friendly texture for consistent torque. Its anodized finish minimises impacts from environmental elements for durability in any scenario.
• REINFORCED TOURNIQUET RETENTION ASSISTANCE CLIP (TRAC) – Conveniently holds the windlass in place until you can secure it into the Tri-Ring Lock- even under extreme lateral loads. The TRAC provides steady handling during tough applications and enhances control for one-handed manoeuvres.
• TRI-RING LOCK – Complete the tourniquet application by securing the windlass into the Tri-Ring Lock. It can easily be manipulated with just one hand and prevents the windlass from shifting during patient movement.
• TIME TAG – A tag for documenting the tourniquet application time. -
TacMed Blast Bandage 50cm x 50cm
• HOOK AND LOOP CONTROL STRIPS – Built into the elastic wrap to prevent accidental unrolling during application.
• LARGE TREATMENT AREA – The bandage features 20″x20″ treatment area when completely opened up, large enough to cover the entire back or chest of most casualties.
• WOUND PAD – Integrated into the bandage, the non-adherent sterile wound site covers the injury site to assist with sustained bleeding control and keep the wound clear of debris.
• SECURING CLIP – Locks the bandage into place to free up the user’s hands to treat other injuries or casualties.
• OCCLUSIVE SHEET – Plastic, occlusive sheet located behind the wound pad that will cover a 15.8″ x 15.8″ area or can be used to cover abdominal contents, minimising the loss of heat and moisture. -
TacMed 4″ Control Wrap/Shrink Wrap
• HOOK & LOOP CONTROL STRIPS – Built into the elastic wrap to prevent accidental unrolling during application.
• SECURING CLIP – Locks to wrap into place to free up the user’s hands to treat other injuries or casualties. -
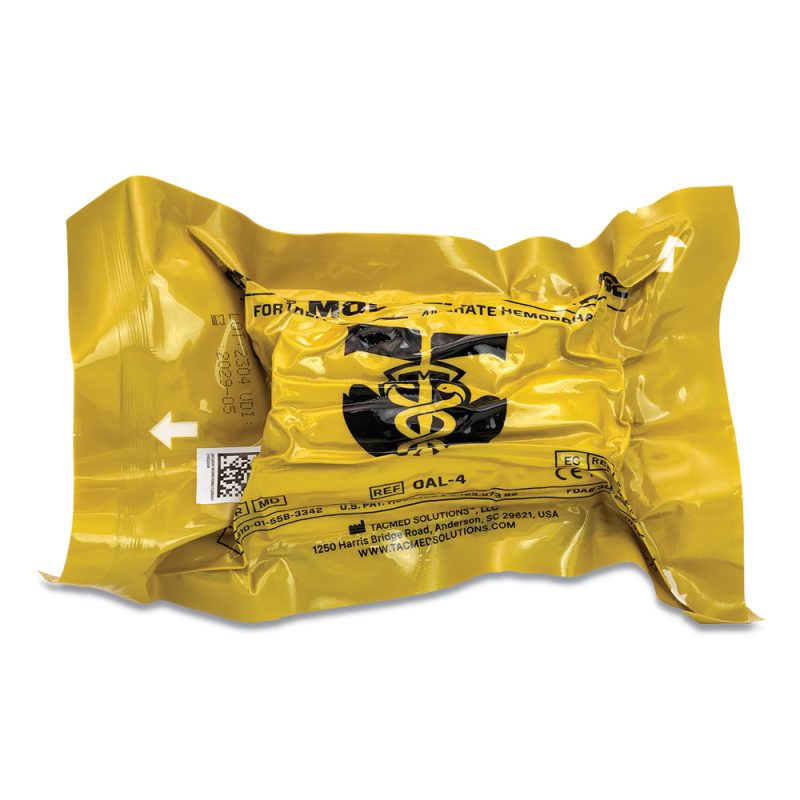
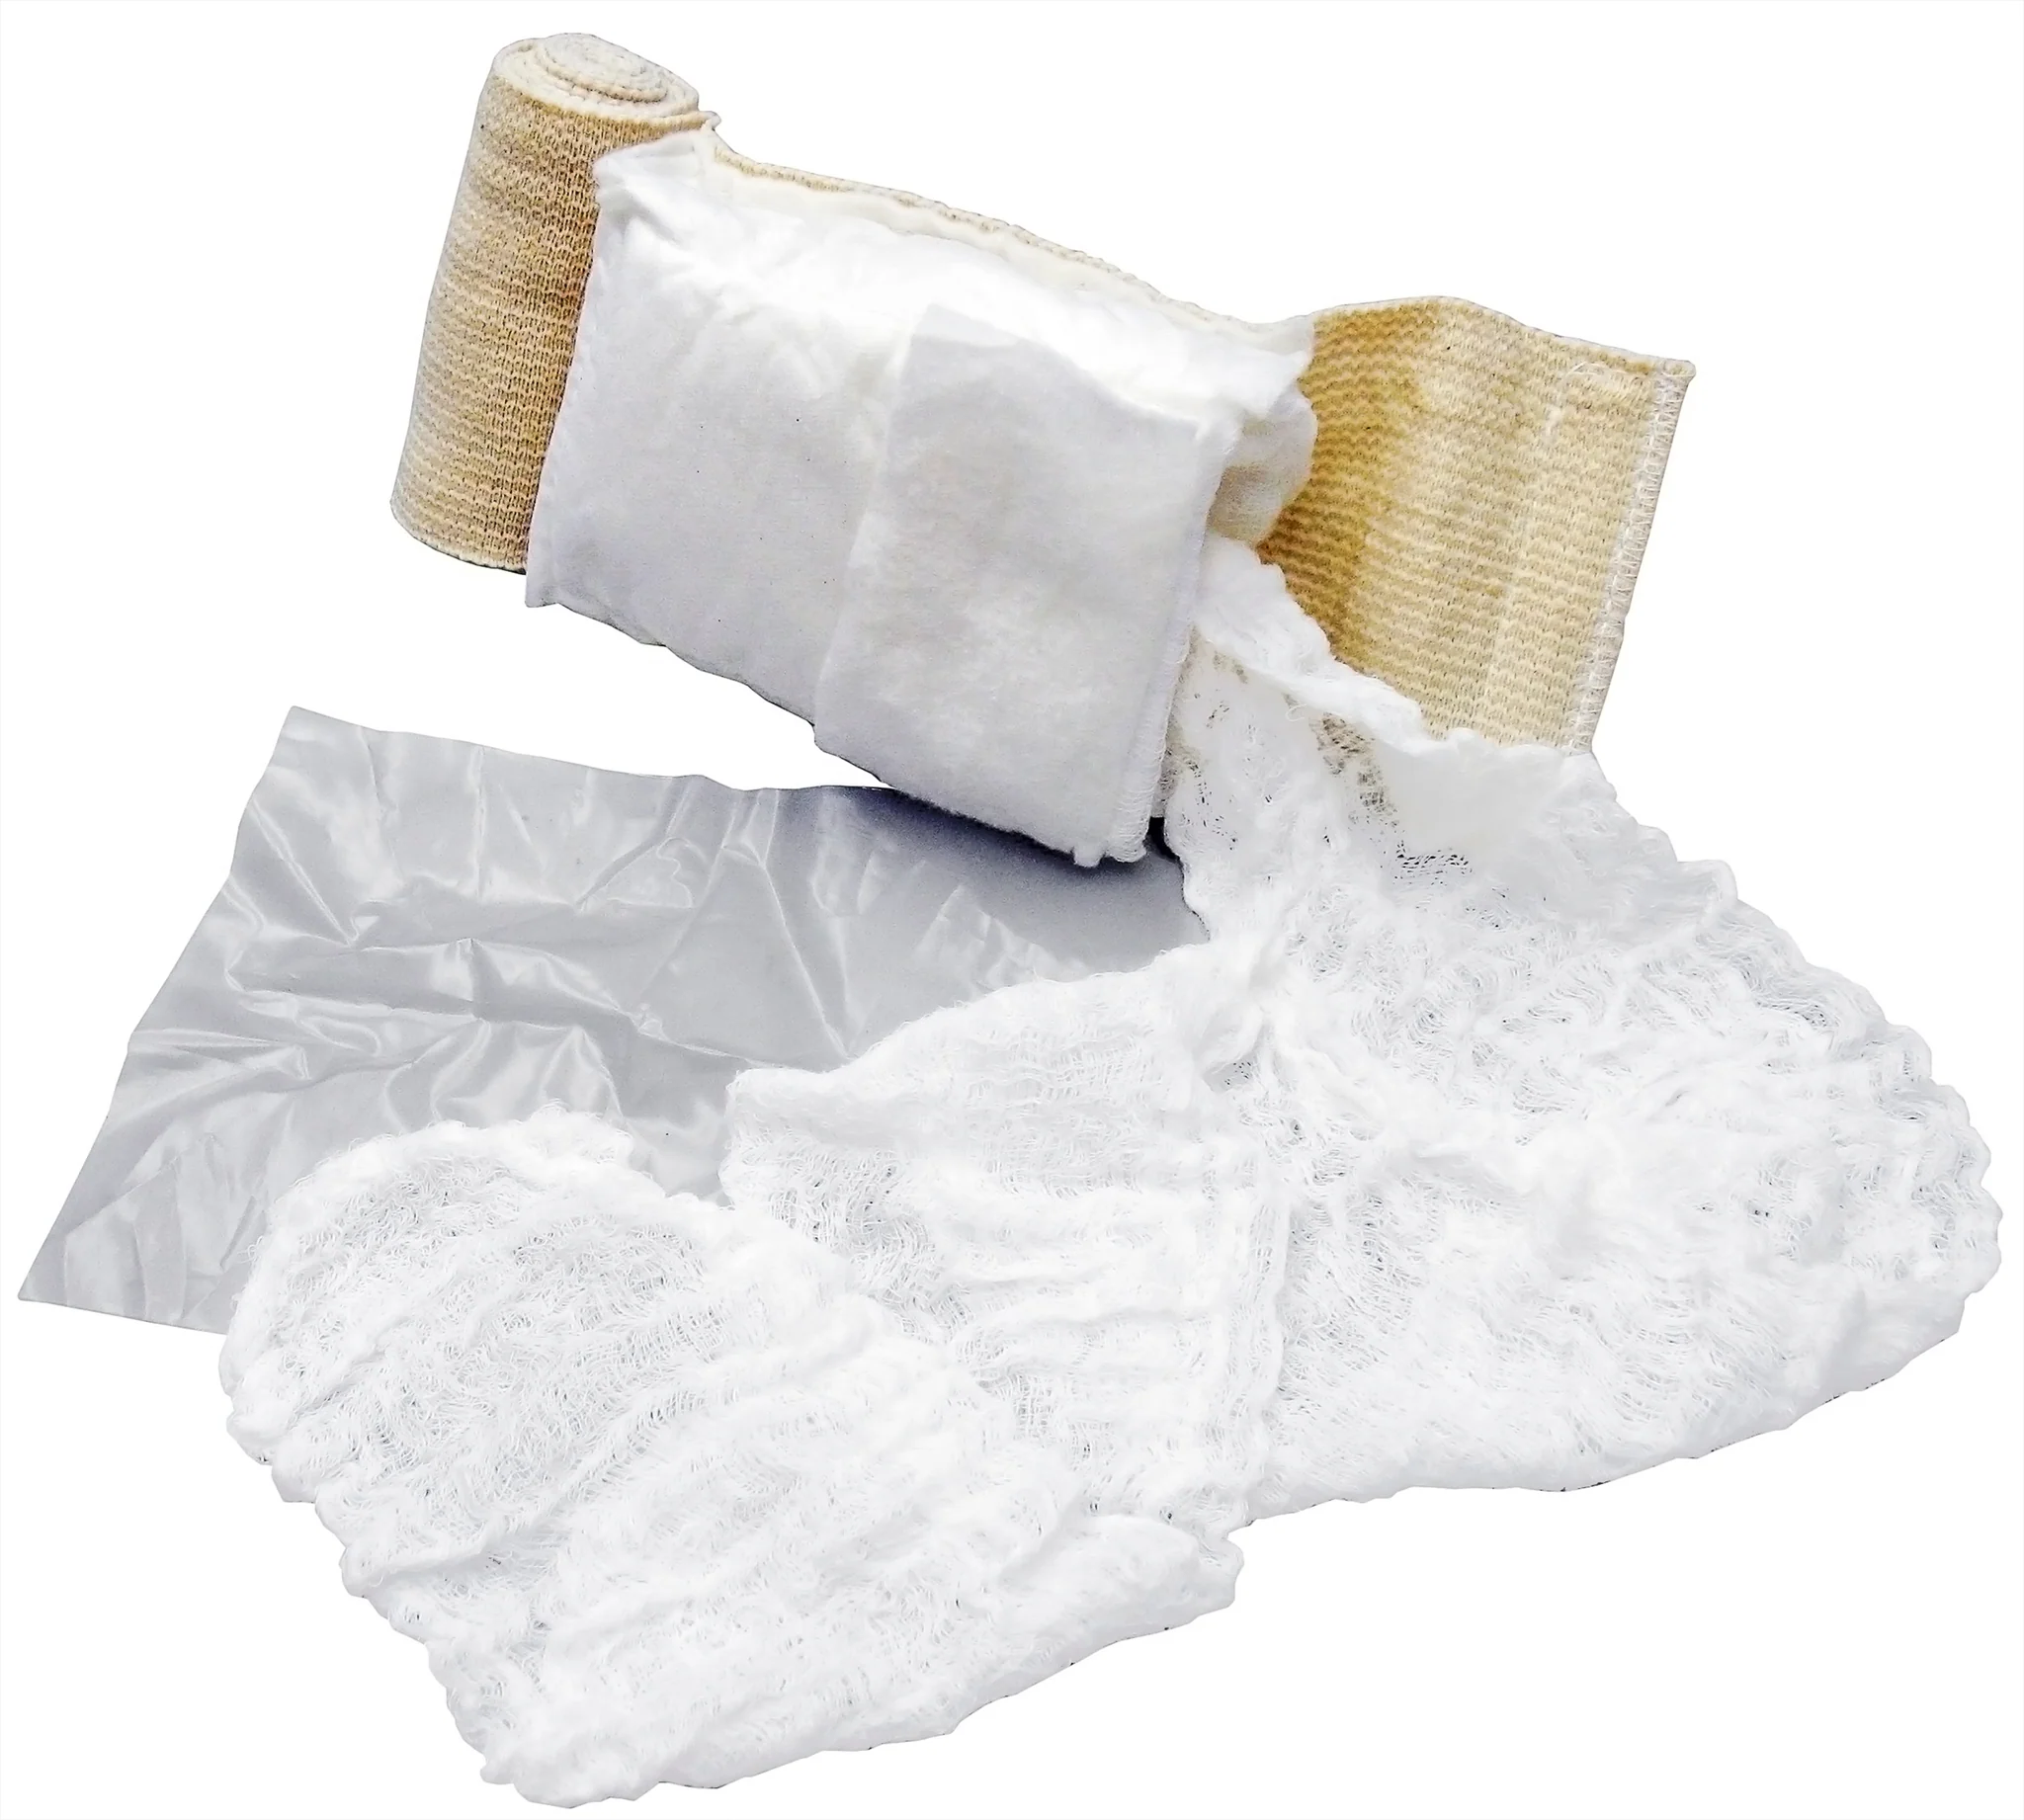
TacMed 4″ Olaes Modular Bandage [10cm]
• HOOK & LOOP CONTROL STRIPS – Built into the elastic wrap to prevent accidental unrolling during application.
• TRUE PRESSURE CUP – Generates focused pressure on the wound site to assist occluding damaged vessels. It can also serve as a rigid eye shield for ocular injuries per CoTCCC guidelines.
• OCCLUSIVE SHEET – Plastic, occlusive sheet located behind the wound pad for increased treatment versatility.
• STERILE GAUZE – Stocked with 3 metres of sterile, zig-zag packed gauze inside the wound pad, ideal for packing wounds.
• WOUND PAD – Covers the injury site to assist with sustained bleeding control and keep the wound clear of debris. It’s non-adherent compartment keeps gauze tucked neatly inside for rapid access during application.
• SECURING CLIP – Locks the bandage into place to free up the user’s hands to treat other injuries or casualties. -
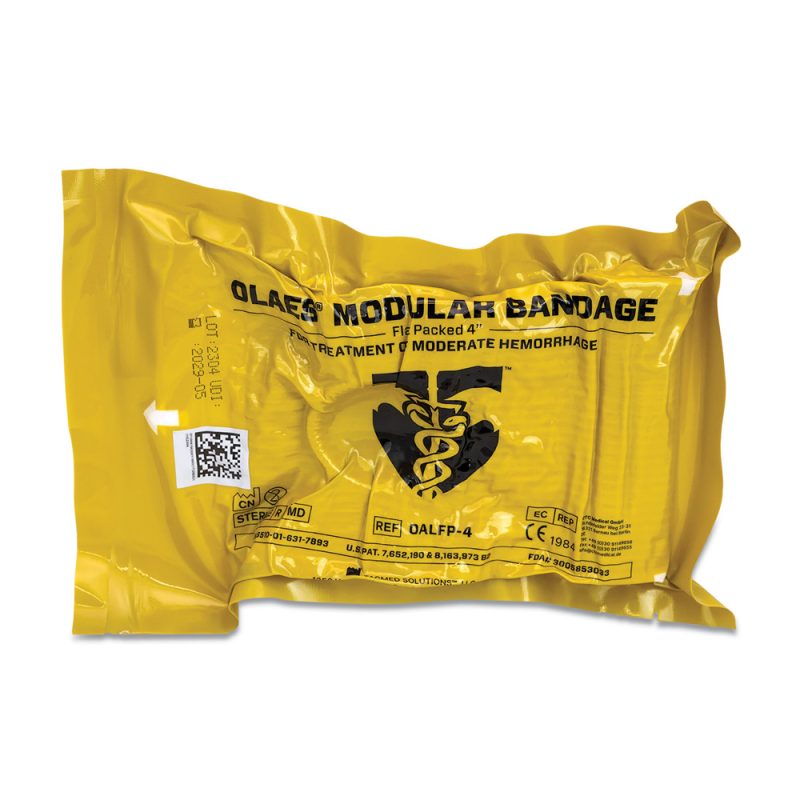
TacMed 4″ Olaes Modular Bandage [10cm] – Flat
• HOOK & LOOP CONTROL STRIPS – Built into the elastic wrap to prevent accidental unrolling during application.
• TRUE PRESSURE CUP – Generates focused pressure on the wound site to assist occluding damaged vessels. It can also serve as a rigid eye shield for ocular injuries per CoTCCC guidelines.
• OCCLUSIVE SHEET – Plastic, occlusive sheet located behind the wound pad for increased treatment versatility.
• STERILE GAUZE – Stocked with 3 metres of sterile, zig-zag packed gauze inside the wound pad, ideal for packing wounds.
• WOUND PAD – Covers the injury site to assist with sustained bleeding control and keep the wound clear of debris. It’s non-adherent compartment keeps gauze tucked neatly inside for rapid access during application.
• SECURING CLIP – Locks the bandage into place to free up the user’s hands to treat other injuries or casualties. -
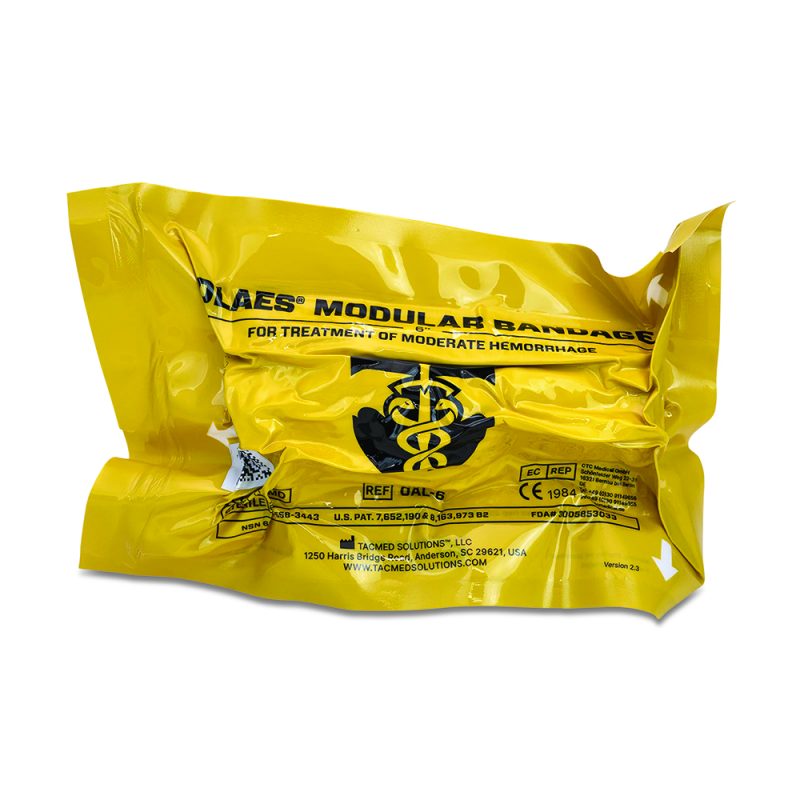
TacMed 6″ Olaes Modular Bandage [15cm]
• HOOK & LOOP CONTROL STRIPS – Built into the elastic wrap to prevent accidental unrolling during application.
• TRUE PRESSURE CUP – Generates focused pressure on the wound site to assist occluding damaged vessels. It can also serve as a rigid eye shield for ocular injuries per CoTCCC guidelines.
• OCCLUSIVE SHEET – Plastic, occlusive sheet located behind the wound pad for increased treatment versatility.
• STERILE GAUZE – Stocked with 3 metres of sterile, zig-zag packed gauze inside the wound pad, ideal for packing wounds.
• WOUND PAD – Covers the injury site to assist with sustained bleeding control and keep the wound clear of debris. It’s non-adherent compartment keeps gauze tucked neatly inside for rapid access during application.
• SECURING CLIP – Locks the bandage into place to free up the user’s hands to treat other injuries or casualties. -
Igloo Pro Hypothermia Blanket – XLarge – Emergency Orange (Gen 2)
PRO: 3-layer hypothermia blanket: Designed to maintain body heat in scenarios involving critical, life-threatening, injuries and conditions.
Product Dimensions 2.3m x 2.2m
Product Weight 743g
Product Packaging Dimensions 21cm x 18cm x 6.5cm
Closure Type VELCRO®
Access Point Anterior & Lateral
-
Igloo Xtreme Hypothermia Blanket – XLarge – Coyote Brown (Gen 2)
XTREME: 3-layer blanket with heat pads: Designed to maintain body heat in scenarios involving critical, life threatening, injuries and conditions – featuring heat pads for active warming.
Product Dimensions 2.3m x 2.2m
Product Packaging Dimensions 21.5cm x 20cm x 8.5cm
Closure Type VELCRO®
Access Point Anterior & Lateral -
Igloo Xtreme Hypothermia Blanket – XLarge – Emergency Orange (Gen 2)
XTREME: 3-layer blanket with heat pads: Designed to maintain body heat in scenarios involving critical, life threatening, injuries and conditions – featuring heat pads for active warming.
Product Dimensions 2.3m x 2.2m
Product Packaging Dimensions 21.5cm x 20cm x 8.5cm
Closure Type VELCRO®
Access Point Anterior & Lateral -
Igloo Pro Hypothermia Blanket – Medium – Emergency Orange
PRO: 3-layer hypothermia blanket: Designed to maintain body heat in scenarios involving critical, life-threatening, injuries and conditions.
Product Dimensions 2.3m x 1.5m
Product Weight 410g
Product Packaging Dimensions 21cm x 30cm x 11cm
Closure Type Reusable Adhesive Tape
Access Point Anterior
-
Igloo Pro Hypothermia Blanket – XLarge – Coyote Brown (Gen 2)
PRO: 3-layer hypothermia blanket: Designed to maintain body heat in scenarios involving critical, life-threatening, injuries and conditions.
Product Dimensions 2.3m x 2.2m
Product Weight 743g
Product Packaging Dimensions 21cm x 18cm x 6.5cm
Closure Type VELCRO®
Access Point Anterior & Lateral
-
Igloo Pro Hypothermia Blanket – Large – Emergency Orange (Gen 2)
PRO: 3-layer hypothermia blanket: Designed to maintain body heat in scenarios involving critical, life-threatening, injuries and conditions.
Product Dimensions 2.3m x 2m
Product Weight 520g
Product Packaging Dimensions 22cm x 11cm x 5cm
Closure Type Reusable Adhesive Tape
Access Point Anterior
-
Igloo Pro Hypothermia Blanket – Medium – Coyote Brown
PRO: 3-layer hypothermia blanket: Designed to maintain body heat in scenarios involving critical, life-threatening, injuries and conditions.
Product Dimensions 2.3m x 1.5m
Product Weight 410g
Product Packaging Dimensions 21cm x 30cm x 11cm
Closure Type Reusable Adhesive Tape
Access Point Anterior
-
Igloo Pro Hypothermia Blanket – Large – Coyote Brown (Gen 2)
PRO: 3-layer hypothermia blanket: Designed to maintain body heat in scenarios involving critical, life-threatening, injuries and conditions.
Product Dimensions 2.3m x 2m
Product Weight 520g
Product Packaging Dimensions 22cm x 11cm x 5cm
Closure Type Reusable Adhesive Tape
Access Point Anterior


1
2